Well, I finally got around to turning something.
This summer my wife and I spent most of our free time in July replacing the fence at the front of our house. When it came to the front gate we wanted to fancy it up a bit. We talked about options like a trellis or lights or some fancy post caps but didn't really settle on anything. So now the posts are bare on top and a lot taller than they really should be.
On the last weekend of July I attended the Saskatoon 2012 Wood Turning Symposium and saw a demonstration on how to do a barley twist by Beth Ireland. Although I was impressed by the versatility of her method, inspiration didn't really hit me at the time. It was only later that an idea of what to do with the gate posts started to form.
The image that eventually formed was that of a wooden candle flame. Although I'm not 100% sold on the giant candlestick look for the gate posts it became one of those things I had to do. Just to see if I could.
I started by creating a profile on my cad program and transferring it to cardboard as shown below.
When I turned the mahogany in the background to match the profile it came out like this.
I immediately christened it the Turnip of Destiny. Yes I am a total geek.
Once the shape was achieved it was time to lay out the twist. I started by making a copy of the template out of thin plywood and using it to mark off longitudinal lines on the turnip.
My lathe has an indexing wheel on it with 36 positions, or every 10 degrees of rotation. For every two lines you make you will get 1 helix, or twist, on your piece. I used every second position, giving me 18 lines and 9 helix. After marking the lines along the length I used the 1/2" increments on the first template to mark out the placement of the lines of latitude. A quick spin of the lathe takes the line all the way around.
Once the grid was marked out I used a cardboard straight edge to mark the diagonals.
If you were making a reed (or rope) style twist you should mark the diagonals starting from all 18 of the long lines but because I planned to make a fluted twist I took a short cut and only marked 9 helix.
As the diameter of the turnip changes the angle of the helix and the space between them also changes. This creates a cool effect as you go along.
Now it was time to pull out my weapons of choice to make the twists. These were a Microplane Rasp with a round blade and a small riffler.
I started with the rasp at the widest point of the turnip and worked my way downhill in both directions, trying to stay centred between the marked twists.
At the ends, where there is less room to work, I used the riffler.
When using the riffler it really pays to use as many of the teeth as possible. Because it is curved you can fall into the trap of just using a small portion. This cuts a few deep grooves, but then it slows down and looks like crap. If you use a curving stroke though, you use all the teeth and, because of the random pattern, it cuts faster and leaves a cleaner surface.
The pattern starts to emerge.
After sanding, two finished fence post finials.
In the end, the hardest part of this project was trying to make the turnips match the template. I really suck at making things match. It actually took longer to turn them than it did to shape the twists.
Tuesday, 9 October 2012
Monday, 10 September 2012
My First Raised Panel Door
Two years ago I re-built the deck outside our back door. The old deck had lasted for 12 years, which I thought was pretty good for untreated spruce. It was starting to show its age though, so we re-built the frame with treated lumber and covered it with cedar. Everything was done except for the access door underneath. The deck was the last project after two years of nearly continuous renovation and fatigue had set in. Since the access door was not essential, it went on the 'do it soon' list and waited.
Fast forward almost two years. I had been working on projects like building fence and shingling the garden shed (By the way, if you ever need any help shingling, I'm busy that day) when a rainy Saturday put outdoor work on hold. Driven by the desire and opportunity to do something in the shop and the guilt of not being able to work outside, I hauled out my small pile of left over cedar...
and set to work.
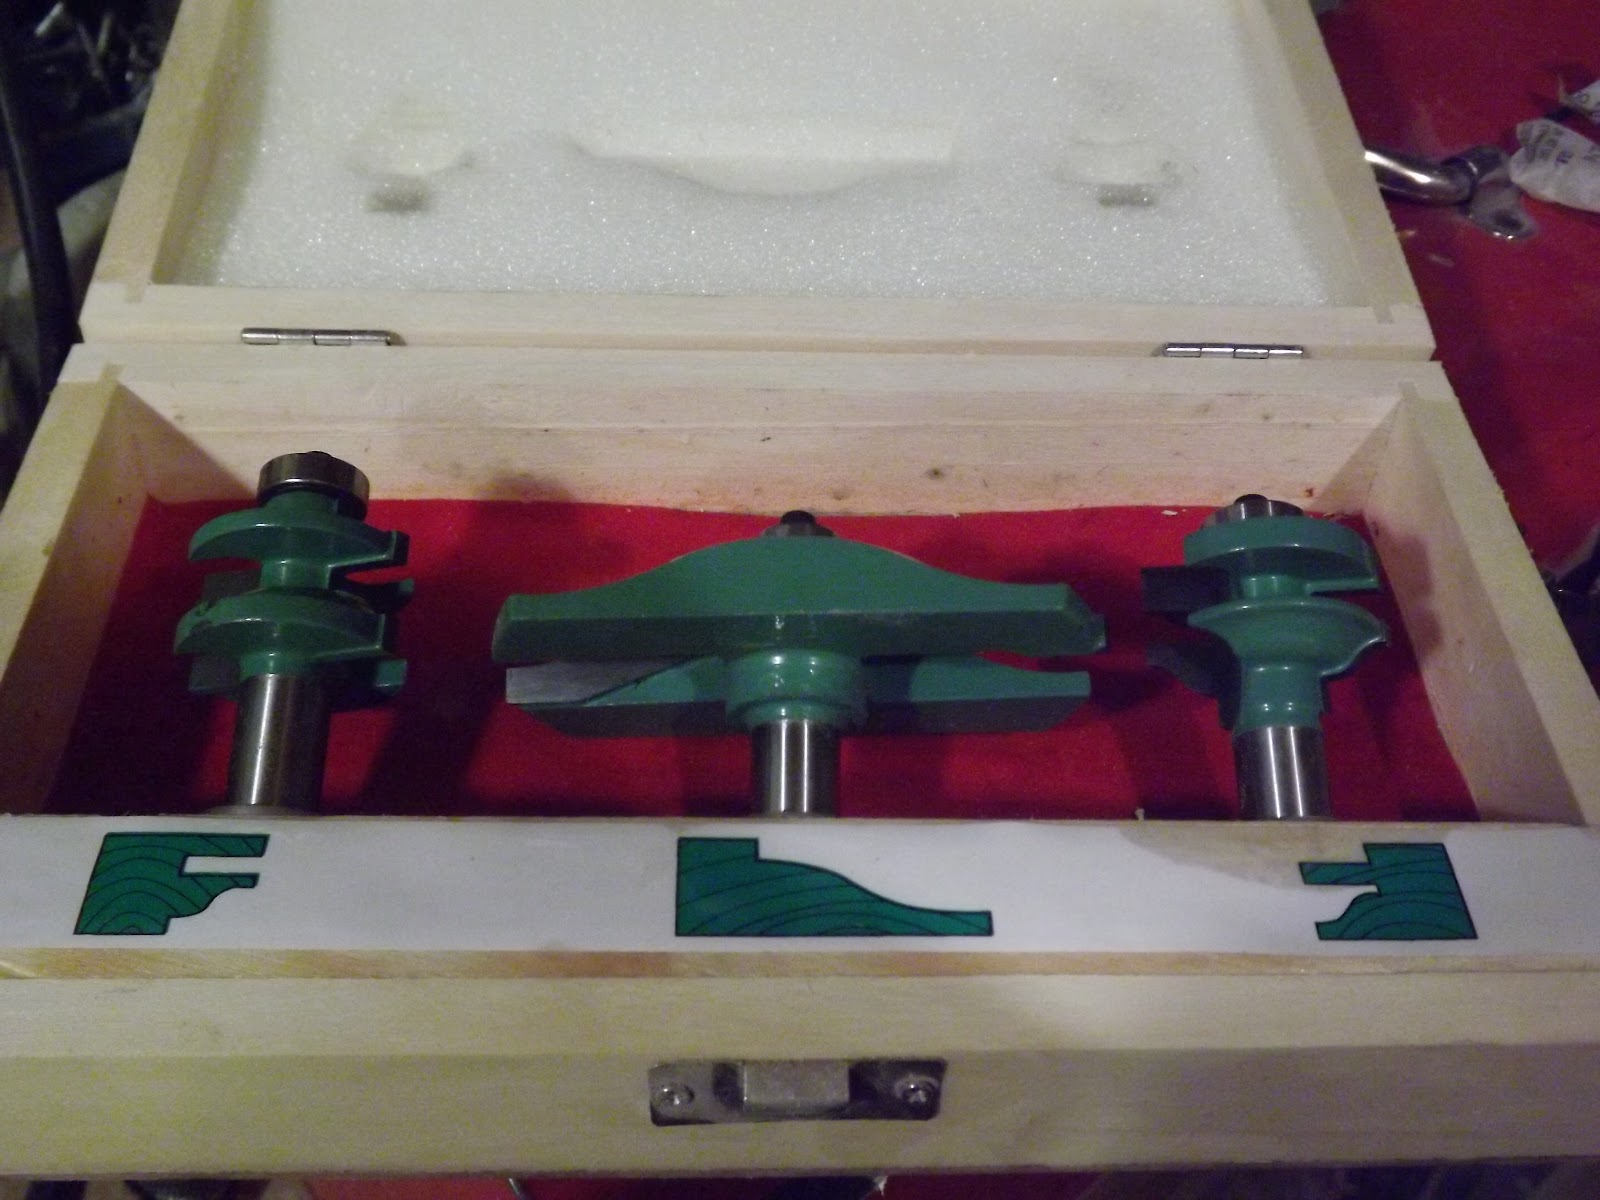
I've had this router bit set since before my son was born (he'll be 10 this month) and never used it.
It was a cheap set. I bought it because I wanted to be able to make raised panel doors even though I had no plans to make any raised panel doors. This seemed like a good place to practise.
Going through my pile of wood I wasn't sure I had enough long pieces to make the panel and rails but since this wasn't going in my kitchen I figured I could get away with joining a couple of shorter pieces in the middle.
I started by jointing and planing everything to the proper thickness. At this point Norm would usually glue up the panel and set it aside to dry while he worked on the rails & stiles. My little voice told me that I might need those long pieces if I screwed up my rails so I saved them for later. Next, I set up the bit on the left in the picture above in the router table and made a test cut with a spare piece of cedar I had set aside for the purpose. This is the result.
I made another cut on the other side thinking that I could have two sides to test the set up with the next router bit. This is what happens when you don't pay attention...
This is why you do test pieces. Anyway, I ran one side of both the railes and the stiles through so they all had this profile, making sure they were face down and inside against the fence. That part all went fine.
The next step is to make a negative cut on the ends of the rails so that they fit into this profile on the stiles. This is done with the bit on the right side of the photo. In order to keep the rail square to the fence I made this mitre guide.
After a few test cuts I ran the rails through. This is the way the rails and stiles fit togrther.
Hmm... not too bad. Here's the whole frame dry fit together.
Now I can start on the panel without fear that I will have to cut it apart to make new rails. With everything properly jointed there are enough full length pieces to make the panel with 1/2" extra. I cut slots for biscuits, even though I really didn't think I needed them. Sometimes you just want to play with your toys.
I glued the panel together with Gorilla Glue (because it's waterproof) and let it dry overnight.
Now it was time to bring out the big boy router bit, the centre one of the set, to make the profile on the panel. I really liked using this bit because after the panel passed over it the bit created enough of a breeze to blow all the sawdust off the surface of the router table. I used several passes, raising the bit a little each time, to 'raise' the panel. I then used a straight cutting bit to cut a rabbet on the underside of the edge so it would fit into the groove on the frame.
Now it was time to assemble it all and see how it all fit together. I slid the panel into one of the rails. That was fine. Stiles go on the ends... A bit snug but it all fits. Slide in the top rail... It doesn't go in all the way... What the..? AUGHHH! I forgot to cut off that extra 1/2" of width on the panel! Boy, did I feel dumb. At least it was too wide and not too narrow. I trimmed it on the table saw and repeated the previous paragraph on the new edge. I also used my miniature edge plane to shorten the panel just a bit.
The second fitting came together the way it was supposed to so I glued it up and let it set.
So, after two years, the door is finally in place. I didn't realize the huge error I had made, however, until my wife looked at it and asked "So... You can make cupboard doors now?"
Fast forward almost two years. I had been working on projects like building fence and shingling the garden shed (By the way, if you ever need any help shingling, I'm busy that day) when a rainy Saturday put outdoor work on hold. Driven by the desire and opportunity to do something in the shop and the guilt of not being able to work outside, I hauled out my small pile of left over cedar...
and set to work.
I've had this router bit set since before my son was born (he'll be 10 this month) and never used it.
It was a cheap set. I bought it because I wanted to be able to make raised panel doors even though I had no plans to make any raised panel doors. This seemed like a good place to practise.
Going through my pile of wood I wasn't sure I had enough long pieces to make the panel and rails but since this wasn't going in my kitchen I figured I could get away with joining a couple of shorter pieces in the middle.
I started by jointing and planing everything to the proper thickness. At this point Norm would usually glue up the panel and set it aside to dry while he worked on the rails & stiles. My little voice told me that I might need those long pieces if I screwed up my rails so I saved them for later. Next, I set up the bit on the left in the picture above in the router table and made a test cut with a spare piece of cedar I had set aside for the purpose. This is the result.
I made another cut on the other side thinking that I could have two sides to test the set up with the next router bit. This is what happens when you don't pay attention...
This is why you do test pieces. Anyway, I ran one side of both the railes and the stiles through so they all had this profile, making sure they were face down and inside against the fence. That part all went fine.
The next step is to make a negative cut on the ends of the rails so that they fit into this profile on the stiles. This is done with the bit on the right side of the photo. In order to keep the rail square to the fence I made this mitre guide.
After a few test cuts I ran the rails through. This is the way the rails and stiles fit togrther.
Hmm... not too bad. Here's the whole frame dry fit together.
Now I can start on the panel without fear that I will have to cut it apart to make new rails. With everything properly jointed there are enough full length pieces to make the panel with 1/2" extra. I cut slots for biscuits, even though I really didn't think I needed them. Sometimes you just want to play with your toys.
I glued the panel together with Gorilla Glue (because it's waterproof) and let it dry overnight.
Now it was time to bring out the big boy router bit, the centre one of the set, to make the profile on the panel. I really liked using this bit because after the panel passed over it the bit created enough of a breeze to blow all the sawdust off the surface of the router table. I used several passes, raising the bit a little each time, to 'raise' the panel. I then used a straight cutting bit to cut a rabbet on the underside of the edge so it would fit into the groove on the frame.
Now it was time to assemble it all and see how it all fit together. I slid the panel into one of the rails. That was fine. Stiles go on the ends... A bit snug but it all fits. Slide in the top rail... It doesn't go in all the way... What the..? AUGHHH! I forgot to cut off that extra 1/2" of width on the panel! Boy, did I feel dumb. At least it was too wide and not too narrow. I trimmed it on the table saw and repeated the previous paragraph on the new edge. I also used my miniature edge plane to shorten the panel just a bit.
The second fitting came together the way it was supposed to so I glued it up and let it set.
So, after two years, the door is finally in place. I didn't realize the huge error I had made, however, until my wife looked at it and asked "So... You can make cupboard doors now?"
Saturday, 4 August 2012
I Wanna Turn... Something...
So I spent last weekend at the Saskatoon 2012 Wood turning Symposium. Wow. I am totally psyched to do some turning. I just can't decide what I want to do first.
I really felt that the symposium offered a great blend of instruction (this is how you make this), techniques (here's some things to try on your next piece), and inspiration (try to come up with an original idea!). When you put all of these together my creative juices really start to flow. Watch this space in the future for pieces influenced by the likes of Mark Sfirri, Jimmy Clewes, Beth Ireland, and Mike Hosaluk. If you know wood turning in North America, you know that's some pretty shameless name-dropping. But really, they were all there and I attended sessions with all of them and more.
How about a few pictures from the weekend?
I just noticed I have no pictures of the 'wacky bat' turned by Mark Sfirri. That's really too bad because it gave me a couple of ideas that I'm dying to try. It's too bad I won't be able to show what inspired them, assuming I actually get them done.
Another thing that I have been thinking of, in relation to the work of others, is this: Where is the line between 'inspired by' and 'blatant rip-off'? And where do I want to fall? In the case of the boxes in the picture above, I thought it would be cool to add a third level between the top and bottom. Although the result would be something different it would still be pretty obvious where the idea came from. I find now, suddenly, that I am not entirely comfortable with that. It's really not any different from a lot of other things I have made, including the planes Ive shown on this blog.
I guess as long a credit is given when it's due it isn't a bad thing, and it's sometimes necessary to copy the work of others to learn a new skill. Ultimately though, you need to leave a little of your self, your soul, in a piece to make it really satisfying. How you do that is up to you.
I really felt that the symposium offered a great blend of instruction (this is how you make this), techniques (here's some things to try on your next piece), and inspiration (try to come up with an original idea!). When you put all of these together my creative juices really start to flow. Watch this space in the future for pieces influenced by the likes of Mark Sfirri, Jimmy Clewes, Beth Ireland, and Mike Hosaluk. If you know wood turning in North America, you know that's some pretty shameless name-dropping. But really, they were all there and I attended sessions with all of them and more.
How about a few pictures from the weekend?
A barley twist created by Beth Ireland
| An attempted panorama shot of the instant gallery. This didn't work as well as I wanted it to. Too close. |
Beth Ireland describing how she came to create the bowl in the picture.
The non-wood parts are epoxy resin and polymer clay.
Mike Hosaluk hollowing out a ladle. That blur by his shoulder is the handle going around.
Finished product.
A garden of flowers made by Andrew Glazebrook.
And more of Andrew's work.
A pair of Asian influenced boxes by Jimmy Clewes
Another thing that I have been thinking of, in relation to the work of others, is this: Where is the line between 'inspired by' and 'blatant rip-off'? And where do I want to fall? In the case of the boxes in the picture above, I thought it would be cool to add a third level between the top and bottom. Although the result would be something different it would still be pretty obvious where the idea came from. I find now, suddenly, that I am not entirely comfortable with that. It's really not any different from a lot of other things I have made, including the planes Ive shown on this blog.
I guess as long a credit is given when it's due it isn't a bad thing, and it's sometimes necessary to copy the work of others to learn a new skill. Ultimately though, you need to leave a little of your self, your soul, in a piece to make it really satisfying. How you do that is up to you.
Sunday, 15 July 2012
It's About Time...
OK, so it took me about four months, but the spokeshave that I alluded to a while back is finally done. Well, all done but sharpening the bevel, that's a subject for another post. Here is my list of excuses in no particular order: Back pain, foot pain, tax pain, Wood '12, yard work, building fence, and general laziness.
The shave is made using a kit from Lee Valley and the wood came from a pallet. After working with it I decided it was poplar. It's finished with three coats of tung oil.
You may notice that the lines are not exactly those of the traditional shave in the background. I wanted this shave to have an aggressive look, almost evil. Here's another shot of the front.
The shape is not just for looks though. Ergonomics played a big roll in determining the way the shave was shaped. If you look at the grip that I use you can see that my fingers fit naturally on the shave in a way that they can't on the traditional shave.
On the back side those walnut plugs cover up a couple of nail holes. They also add a sort of 'thumbs go here' target reference.
Finally, here is that brass strip I was posting about earlier.
Yeah, I overdid the polishing, but I did get a nice, reflective surface.
The shave is made using a kit from Lee Valley and the wood came from a pallet. After working with it I decided it was poplar. It's finished with three coats of tung oil.
You may notice that the lines are not exactly those of the traditional shave in the background. I wanted this shave to have an aggressive look, almost evil. Here's another shot of the front.
The shape is not just for looks though. Ergonomics played a big roll in determining the way the shave was shaped. If you look at the grip that I use you can see that my fingers fit naturally on the shave in a way that they can't on the traditional shave.
On the back side those walnut plugs cover up a couple of nail holes. They also add a sort of 'thumbs go here' target reference.
Finally, here is that brass strip I was posting about earlier.
Yeah, I overdid the polishing, but I did get a nice, reflective surface.
Monday, 2 July 2012
Exotic Wood Close to Home
Woodworkers love exotic woods. Vivid colors and strong grains catch the eye and can give a piece that wow factor we all want. Wood from far away places like Africa, South America, and Australia add extra cachet to your work.
Exotic can also be in the eye of the beholder, I've found. A friend told me about a time he was on vacation in the Carribean and watched a worker use a sledge hammer to drive a beam of purpleheart into place. He said it almost made him cry.
In that spirit I would like to tell you about some extremely rare wood that I recently harvested.
That tall spindly thing between the houses is an apple tree. It is shaded from the east by my neighbor's house, from the south by the large pine at the front of the picture, and from the west by large trees on the other side of the yard. As part of our plan to rejuvenate this side of the yard these two trees, along with two more, are coming out. (Before you get too upset about four trees being cut down, you should know that this still leaves eight trees in my front yard alone. If you are still upset, come over and rake leaves this fall.)
There should be enough there for at least eight bowls, although I hear fruit wood is also good for making spokshaves. That rings a bell for some reason...
Whatever I choose to make from this tree, no one else will have wood quite like this, and that's about as exotic as you can get. I have a couple of other 'exotic' woods in my collection already. These pieces are made from a mountain ash that grew in my back yard:
This bowl came from a big leaf maple burl that grew in the back alley two doors down.
No, I didn't cut it down in the middle of the night. I happened to see the guy cutting it down and offerred to help if he gave ms some of the wood. He gave me a piece about two feet in diameter and three feet tall, covered in burl. It was all I could do to roll it over to my yard. He said a friend of his was going to take the rest for fire wood. Doesn't that almost make you cry?
Exotic can also be in the eye of the beholder, I've found. A friend told me about a time he was on vacation in the Carribean and watched a worker use a sledge hammer to drive a beam of purpleheart into place. He said it almost made him cry.
In that spirit I would like to tell you about some extremely rare wood that I recently harvested.
That tall spindly thing between the houses is an apple tree. It is shaded from the east by my neighbor's house, from the south by the large pine at the front of the picture, and from the west by large trees on the other side of the yard. As part of our plan to rejuvenate this side of the yard these two trees, along with two more, are coming out. (Before you get too upset about four trees being cut down, you should know that this still leaves eight trees in my front yard alone. If you are still upset, come over and rake leaves this fall.)
There should be enough there for at least eight bowls, although I hear fruit wood is also good for making spokshaves. That rings a bell for some reason...
Whatever I choose to make from this tree, no one else will have wood quite like this, and that's about as exotic as you can get. I have a couple of other 'exotic' woods in my collection already. These pieces are made from a mountain ash that grew in my back yard:
This bowl came from a big leaf maple burl that grew in the back alley two doors down.
Tuesday, 29 May 2012
Wood '12 is on now!
Wood '12, the annual exhibition of woodcraft by members of the Saskatchewan Woodworkers Guild, is now on. The show also features work by area high school students. I just happen to be the set-up co-ordinator for this year's show. Here are a few pictures from the show.
These are the door prizes:
Some turnings:
This instrument is called a Hurdy Gurdy. Believe it or not it sounds a lot like bagpipes.
Boxes & small cabinets:
And small:
These are the door prizes:
Some turnings:
This instrument is called a Hurdy Gurdy. Believe it or not it sounds a lot like bagpipes.
Boxes & small cabinets:
Carvings both large;
And small:
Here is a small sample of the work of students from some of the area high schools.
There are over 400 pieces all together. Here are some more in a youtube video put together by Bob Baker. The best way to see the show, however, is to actually get out and see it. The show is at the Galleria Building on Innovation Boulevard, Saskatoon, SK. Hours are 11 am to 8pm until June 2nd and 11 am to 4pm on June 3rd. Best of all, there is no admission charge.
Saturday, 21 April 2012
When is "good enough" not good enough?
A couple of posts ago I was lamenting the shortcomings of my vintage Stanley #60 spokeshave and I wrote "I guess building a spokeshave is in my future." To be honest, I've had a spokeshave kit for almost a year now and I had just misplaced it for a while. What was lost, however, is found again and I have started to build it.
My original intention was to post about the process (I have lots of pictures) and thrill you with the story of how I recovered from my massive screw up, but something else happened that I felt I needed to talk about. If you really feel you need to know how to build a spokeshave you can read about it here.
At one point in the instructions, very near the end, it says "Lay a piece of 120x sandpaper on a flat surface. Sand the sole of the spokeshave until the brass parts are flush with the surounding wood." The brass parts refered to are the brass strip in front of the blade and the two screws used to hold it in place. I clamped one end of a role of 120 grit sandpaper to my jointer and carefully began to sand.
After about a hundred strokes I was almost done. The screws were nicely flush with the brass strip and the strip was about 90% sanded. Just a the two front corners that were a little high. Good enough for a first try at a spokeshave...
"You can do better."
Besides, my sharpening experience has taught me that when it looks like you are 90% done you still have 90% of the work left to go...
"You can do better."
I had already spent a lot more time on this than I planned due to a careless mistake that I had made. Leaving these corners would help me make up for lost time...
"You can do better."
Sigh...
In the end, it only took me another 130 strokes to finish it off.
You may notice that I even 'clocked' the screws. Thank you Chris Schwarz for that little obsession. The instructions that came with the kit don't say anything about making the brass any smoother than this, but there's no way I can leave it at that. I want that brass polished so I can see my reflection when I'm done.
So why is "good enough" not good enough?
I've stared at this question for three nights in a row now and I'm still not sure I've got it. Pride, of course, is the simple answer, but it goes beyond that. If you read my blog regularly you know that I make a lot of mistakes and I'm not too proud to share them. Somewhere deep down I need to get this right.
Actually, my mistakes have been on my mind a lot while I stared at that question. I'm not afraid of mistakes and I'm sure I will make more as I go. At some point though, I want to be able to pick up my tools and know, whether I'm doing it for the first time or the hundredth time, that I can get it right. I want to know that the result will be useful and beautiful and lasting.
I guess that by obsessing over this one little detail and getting it right I am reassuring myself that that day will come. One detail at a time I am building the skills to make it happen. As I create these tools they become an extension of myself and part of me will flow through them into everything I make.
My original intention was to post about the process (I have lots of pictures) and thrill you with the story of how I recovered from my massive screw up, but something else happened that I felt I needed to talk about. If you really feel you need to know how to build a spokeshave you can read about it here.
After about a hundred strokes I was almost done. The screws were nicely flush with the brass strip and the strip was about 90% sanded. Just a the two front corners that were a little high. Good enough for a first try at a spokeshave...
"You can do better."
Besides, my sharpening experience has taught me that when it looks like you are 90% done you still have 90% of the work left to go...
"You can do better."
I had already spent a lot more time on this than I planned due to a careless mistake that I had made. Leaving these corners would help me make up for lost time...
"You can do better."
Sigh...
In the end, it only took me another 130 strokes to finish it off.
You may notice that I even 'clocked' the screws. Thank you Chris Schwarz for that little obsession. The instructions that came with the kit don't say anything about making the brass any smoother than this, but there's no way I can leave it at that. I want that brass polished so I can see my reflection when I'm done.
So why is "good enough" not good enough?
I've stared at this question for three nights in a row now and I'm still not sure I've got it. Pride, of course, is the simple answer, but it goes beyond that. If you read my blog regularly you know that I make a lot of mistakes and I'm not too proud to share them. Somewhere deep down I need to get this right.
Actually, my mistakes have been on my mind a lot while I stared at that question. I'm not afraid of mistakes and I'm sure I will make more as I go. At some point though, I want to be able to pick up my tools and know, whether I'm doing it for the first time or the hundredth time, that I can get it right. I want to know that the result will be useful and beautiful and lasting.
I guess that by obsessing over this one little detail and getting it right I am reassuring myself that that day will come. One detail at a time I am building the skills to make it happen. As I create these tools they become an extension of myself and part of me will flow through them into everything I make.
Subscribe to:
Posts (Atom)