Sunday, 27 March 2016

Time to Do What You Do When You Don't Get Off the Pot


For some years now I have been, well, 'obsessed' may be a strong word, but very curious about building an infill plane.  It morphed from 'Can I do that?' to 'I want to do that' to 'I'm going to do that.'  It has morphed from a casual eye out for old, well seasoned wood to finding a source for O1 tool steel to a frantic search for anyone who would sell me C220 bronze.

Now that I have the materials that I need, the work can begin.  It's not going to happen overnight, though.  I have set a goal of 2 years to finish this thing.  There will be lots of other projects during that time as well, I hope, maybe even a couple of wooden planes.  There are a lot of things I have to learn before I can finish this, but there are no more excuses.

Monday, 15 February 2016

Some Stuff from the Holidays

When I took this picture the camera told me that the stormtrooper blinked.
I actually spent a fair amount of time at the lathe in December and I even have some things to show for it.  I suspect that most woodworkers have the same experience at least one December in their lives as they prepare gifts for friends and family.

I started the month by demonstrating turning at the Guild booth at the Sundog Arts & Entertainment Faire.  I  found myself with 5 hours of time to fill and I was determined to make the most of it.


The first thing I made was this little bowl from a leftover piece of Manitoba Maple.  It is finished with mineral oil and bees wax and measures just over 3 1/2 " across.


Next was this pen made from padauk and finished with Hutt Perfect Pen Polish.  After the pen I moved on to a small natural edge bowl.  I was almost done when there was a 'tick-BANG' and there were pieces all over the floor.  Fortunately there was no one watching at the time except for a couple of Guild members.  On to another pen.


This one was made from Alumilite casting resin, the 5 minute stuff, mixed with yellow dye and swirled with black.

With time winding down I moved on to what I thought was going to be a lidded box,  As I was roughing it out I stopped the piece of mountain ash I was turning to check my progress.


What I saw was this cool swirl of bark and the grain around it.  I was so taken with it that I decided to leave it the way it was.


When I took it home I drilled some holes in the top and stuck some tea lights in them.


After that I turned my attention to making my wife some Christmas presents.  I wanted to do something to help her out with her sewing habit, so I ordered some seam ripper kits from William Wood-Write,

Single ripper, closed, in Alumalite

Double ripper, open, Kingwood

Ripper & stiletto, open, unknown burl
If you've never seen one of these things before, let me warn you that they are nasty little weapons that would never be allowed on an airplane.  If your wife is mad at you, do not make one of these as a suck up gift.  If she's not in a good mood when you hand it to her you are taking a risk.

On the safer side, I also made her this bracelet.


It is made from maple and Indonesian rosewood.  I should have taken pictures while I was doing it because this thing was a struggle from start to finish, and I could have made a long blog post on this alone.  One thing I will talk about though, is the first of the problems I encountered.  Of course, when I cut the segments, I didn't get the angle right.  Fortunately I made my angle a little too narrow instead of too wide, so when I went to glue the two halves together I had to sand the inside corners, not the outside, to make them fit.


If you look at the maple piece that is vertical at the front, it looks the same as the others, but the one opposite on the inside is quite a bit narrower.  The tricky part was to stop sanding at the right point.  I guess I lucked out.

My wife was happy with the bracelet and and the seam rippers, although she did have a little constructive criticism about the rippers.  I will definitely make use of her advice when I make some more.

Sunday, 10 January 2016

This is Why I Will Never Turn Pro


Okay, maybe not because of this box exactly, but it is one good example of why it would be a bad idea.

A lot of people dream about making a living their hobby.  Some, like my wife, actually give it a shot. Most do not.  Few really try, and few of those that do succeed.  I am not one of those.  Not that I have never thought about it.  There is a certain allure to the idea that I could make money doing what I love.  It would also be untrue to say that I have never sold any of my work.  So why am I so sure I will never make the leap?

Part of it is knowing my own limitations.  I do not work quickly.  That box above, along with a pen & pencil set I turned, was a thank you gift for a friend who did me a very generous favor.  It took me almost 2 years to get it done.  Paying customers would never be so patient.

Another reason is that I believe that working for yourself is really just an illusion.  If you want to make money you have to make what people will buy.  This means that you are making what they want, not necessarily what you want.  Right now I have made 3 of these pen boxes, although none of them are exactly the same.  If I had to make 10 the same it would become work.  If I had to make 50 the same it would be drudgery.

Freedom, to me, means being able to do what you want when you want.  Right now I don't have total control over the when, but I do control the what.  I am free to follow wherever my curiosity leads me and test my skills in whatever way I see fit.  If the price of that is that I don't get to spend all day every day in the shop, it is balanced by being able to enjoy the time that I do spend there.

Saturday, 2 January 2016

Down the Rabbit Hole

So on my last post I airbrushed that vase and I kind of got caught up in the whole airbrushing thing for a while.  Although it has nothing to do with woodworking, I'm going to show you what I was up to for the summer.  Some of it anyway.  Just the stuff that sort of looks like it was supposed to.


A couple of bags that I did for my wife.


The background was done by spraying onto a scrunched up plastic grocery bag and dabbing it onto the cloth.


Okay, so I do a lot of flowers.  I can because I'm secure in my masculinity.

These next two were copied from this video from YouTube.  The top one was first, the bottom one second.


I leave it up to you to decide which one was better or more accurate.


The fish scale effect was achieved by putting on an orange base coat and then airbrushing yellow through one of those mesh bags that onions come in.


Experimenting with neon effects.


This is kind of my grand opus.  There are still a lot of mistakes, large and small, but overall it came out pretty good for my skill level.

Airbrushing can be a lot of fun.  It also makes you look at things a little differently.  I find I pay more attention to the way light hits things now. The other day, for example, I was cleaning the bathroom and it took a lot longer than usual because I was spending a lot of time staring at the toilet.  It's all white, all the same colour, but the way light hits each surface allows the eye to tell them apart.  It's just not something I had ever noticed before.

I will be doing more airbrushing.  I'm definitely not done with it.  I'm going to keep experimenting and more of it will turn up on future pieces.   

Saturday, 31 October 2015

Another Trip Outside the Comfort Zone

OK, I'm way behind in my blogging responsibilities, but I'm working to catch up.  Considering that I started working on this vase about... well... less than ten years ago (but more than seven), four months to blog about it isn't too bad.


This vase is the result of some more recent influences, especially from the Saskatoon 2014 Woodturning Symposium.  The emphasis there was more on surface decoration rather than turning techniques, and initially I was kind of disappointed with it because I thought that I would never use any of what I was learning.  I did check out Binh Pho's airbrush demo though because I had done some airbrush tattoos before and it is a lot of fun.

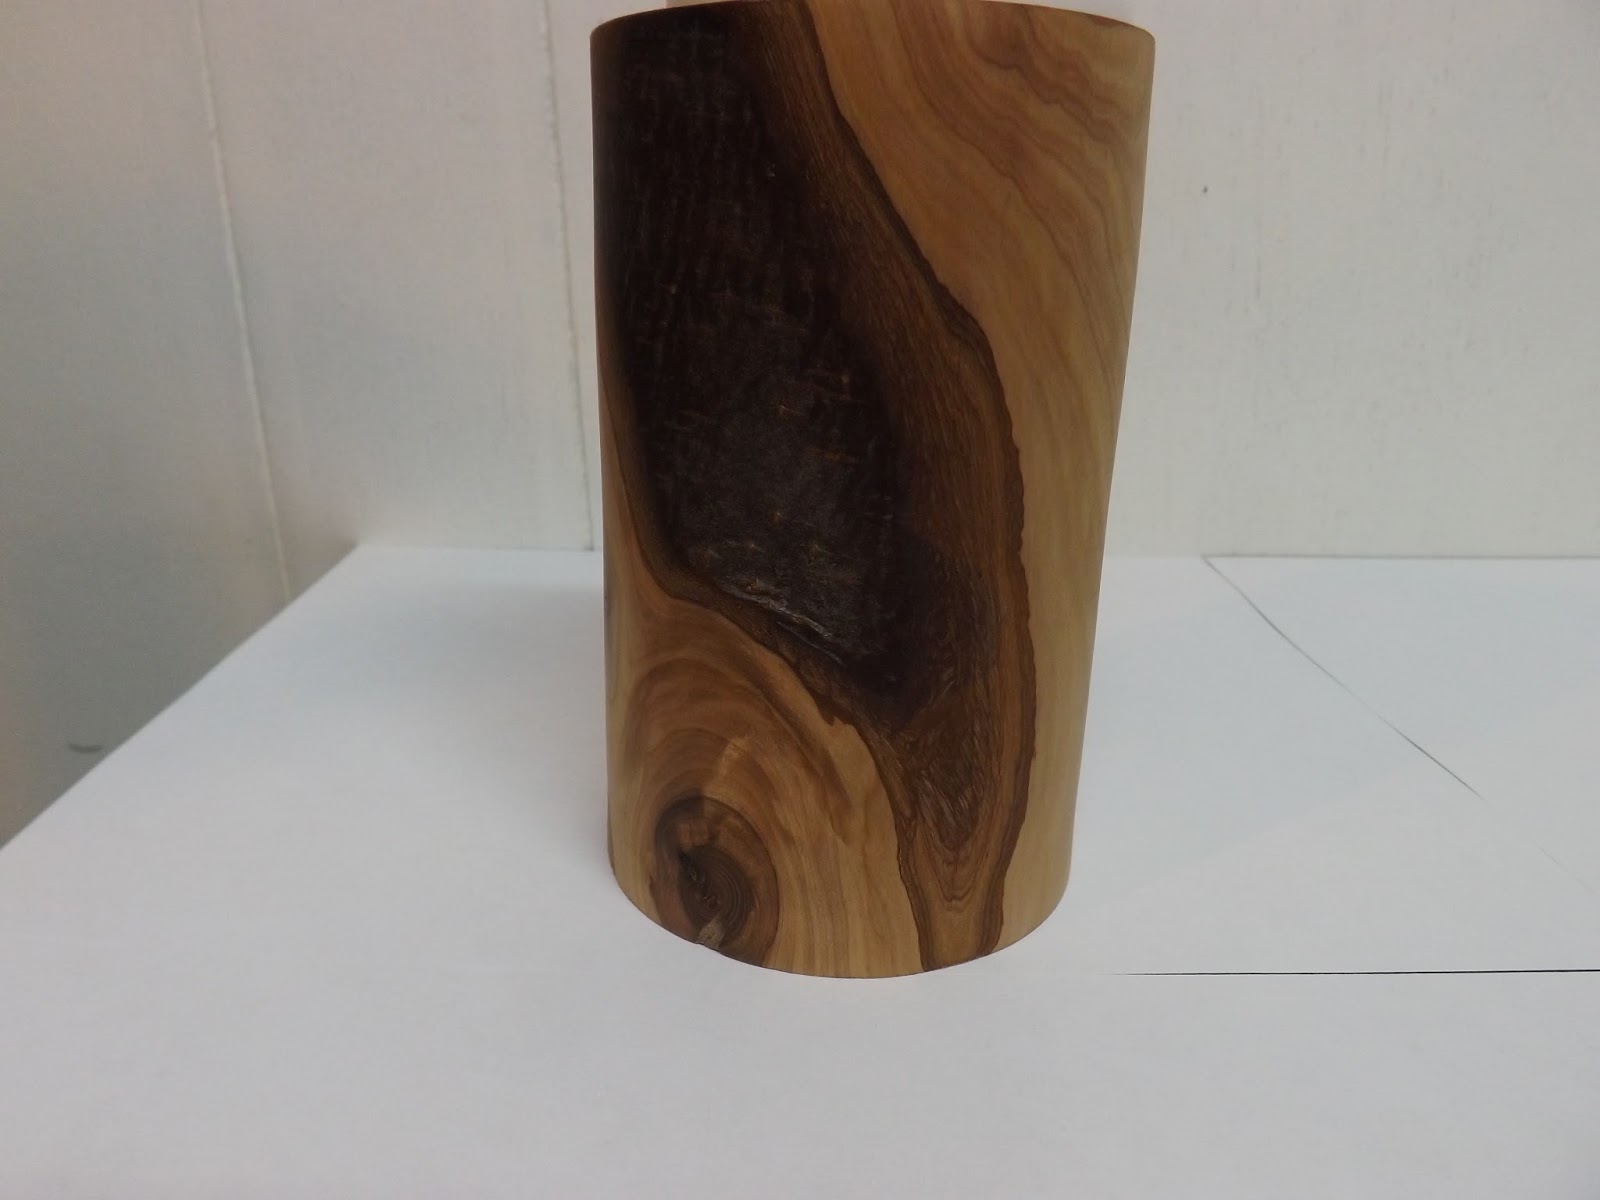
I started the vase itself all those years ago as a natural edge project.  It is made from birch and was originally turned wet to about 3/4" thick and left to dry for a while.  When I went back to it I found it had cracked so I filled the cracks with epoxy and thinned the walls a bit more, then let it dry a while longer.  When I came back to it again  the cracks were larger and more numerous.  More epoxy and I started to turn it again but this time it flew off the lathe when the base snapped.  I set it aside for a few  more years.

Fast forward to the 2015 Matisho Memorial.  I decided that I wanted to try some air brushing on something but I didn't want to spend a lot of time starting a turning from scratch, and I especially didn't want to cover a good piece of wood with paint.  This vase, sitting in the 'corner where projects go to die', was the obvious choice.


Even more epoxy, and this is what I started with when I got to Waldheim.  The first thing I needed to do was to put it between centres and turn the foot so I could grab it with the chuck.  In order to do this I needed a centre at the top end of the vase.  Fortunately I had a piece left over from a face plate turning (I am not a hoarder, I swear) that fit nicely inside and gave me a centre for the top end.


After I turned the foot I turned the bowl around and knocked off the natural edge.  I kept turning until I had this.


The next step was to cover it in sanding sealer and let it dry for a while.  While I waited I sketched out some flowers.


The numbers are there to show the stages in which the masking is removed from the vase.  When  the overlapping edges are outlined with black this helps to give the petals some depth and separation.  Once the sanding sealer had dried it was time to transfer the flowers to the vase.  For this, I used wax free transfer paper.  It won't interfere with the paint and comes in multiple colors so I can remember which color I was going to paint each flower.


I did my best to erase the parts of the flowers that were 'under' the other flowers but I wasn't 100% successful.  It didn't matter in the end anyway other than helping to keep my layers straight.

Before I started painting I had to make sure that the paint went where it was supposed to.  I covered the vase with frisket, a thin, clear, sticky backed film that cuts easily.  Because the vase tapered as it went I cut it into tapered strips and stuck them on.  Later I realized that, because I was painting the background in this step, I could have just covered the flowers alone and I would have saved a lot of frisket.


I painted the inside yellow to start.  It took a few coats to hide the epoxy.   I had been concerned that the epoxy would simply repel the paint but using lots of light coats eventually colored it over.  You can still see where it was if you look but it doesn't jump out at you as badly as it might have with other finishes.   After painting the interior I used a scalpel to cut the frisket around the flowers and peel away everything that covered the background.


The background consists of three layers.  The first layer is a translucent blue-green (viridian according to the bottle) followed by a thin layer of opaque yellow and finally another layer of viridian.  If you think it looks a little blotchy, it was deliberate.  The intention was to simulate an out-of -focus background of grass.  To be honest though, I really didn't pull it off.  The other thing I should have done before I painted the green was outline the top and bottom of the flowers with black.  This would have helped them to stand out from the background.  One thing I have learned about airbrushing is that everything looks like crap until you remove the masking.


  Once the paint had dried I re-applied the Frisket so I could paint the individual flowers.  At this point I got carried away (once again) and forgot to take any pictures.  If there is anyone who reads this blog, they must get frustrated by this habit of mine.  This time though, because the painting is the biggest part of this project, and because I don't need to make another vase to show how it was done, I'm going to recreate the process for you.


It starts with a drawing of a flower.  In this case I laid the frisket on top of the paper and drew the flower on top.  Then I used an X-acto knife to cut along all the lines.  Make sure to cut through the intersections slightly.  The numbers show the order in which the pieces of frisket are removed.


Remove the sections with the number 1 on them and paint lightly along the edges where they border other sections but not the outer edges.


Repeat the process for the number 2 sections, followed by the number 3(s) and 4's.  When you remove the 4's the only place you need to paint is right at the base where they meet the centre.


Now you can see some separation, some of the petals look like they are 'under' the others. The frisket is still over the centre and all around the outside.


The next step is to add some colour.  I'm not painting individual petals at this point, just trying to get a semi-even coat over the whole thing,


Now I have cut a piece of paper with a curve that starts with a large radius and tightens as it goes.  I lay it on the flower and try to line it up with a low spot in the top of the petal, then paint along the edge.  The goal is to get paint on both the paper and the flower.  Repeat the process all around the flower, changing the part of the curve that you use, or flipping it over, to add some variation.


When I did the vase this is the point where I stopped.  Since then though I have tried to get things to look a little more realistic by shading things to give them the appearance of light hitting the high spots.

Here is the finished product with the centre painted an the frisket removed from the outside.


I think I went a little overboard with the shading and the centre isn't as sharp as it should have been, but at least it still looks like a flower.  Here is a closer look at the flowers on the vase.


As you can see it didn't come out looking like a professional job but, like a lot of my stuff, it looks good from a distance.  The airbrushing was fun and there are lots of techniques to try.  It has kind of sucked me in for a while, and I will share more later.

Sunday, 13 September 2015

Troll Bridge

Back in June of 2006, I bought that month's issue of Fine Woodworking because of a cover that promised "Razor sharp in two minutes."  I was just beginning to learn to sharpen at the time and, having spent long hours flattening the backs of my chisels and plane blades and giving them fresh bevels I was intrigued.  Although I never adopted any of the methods described in that article, one other article magazine has stuck with me to this day.


That article was "An Exercise in Design" by Mark Schofield.  In it, he was building a hall table inspired by a bridge like the one in the picture above.  Because of copyright I can't show you the actual picture, so this is the Broadway bridge here in Saskatoon.  Its close enough so you get the idea.
Schofield was using steam bent arches for the legs and he was worried that under load the arches would spread and the table top would sink down.  Looking for ideas, he sent the picture, along with the dimensions of his table and an explanation of his problem, to three other furniture makers.

These gentlemen (Jere Osgood, Wayne Marcoux, and Garrett Hack) all came back with different solutions to the problem.  Although there were similarities all of designs were quite distinct, solving the problem in very different ways.  In the end, Scofield ignored all of their designs and did his own thing.  If it proves anything, it proves that if you ask 4 different woodworkers how to do something, you will get 6 different answers.

Of course, I had my own idea for the table.  Did I rush to the shop to build it?  No.  I sat on it for almost nine years.  And, really, I still haven't built it (This is not an unusual process for me.  I think it might make a good blog post some day) but at least I have built a prototype.  Half size.


Instead of having the arches go vertical, I put them on angles so they crossed.  Then, to keep them from spreading, I ran a stretcher between and through them.

The impetus to build this prototype came from the Guild's annual 2 x 4 challenge.  Here is the 2 x 4 in original condition.


The legs are each made up of  eight 1" x 1/8" x 40"  strips.


These were then bent around a form and then all glued together except for the inside strip.  This will make sense soon, I promise.


If you're looking at that picture and thinking "That's not enough clamps" or "He should have used something to spread out the pressure" you're right.  It was pretty obvious when I took it off the form where the clamps had been.  It's just the prototype though so I didn't get too bent out of shape (Pun intended),  On the next leg I did use some cauls and it looked a lot better.

The next move was to taper the legs from the centre to the ends.  I wanted the legs to end up 1/2" thick at the ends so, because there was still one strip to glue on, I marked them at 3/8" from the outside edge and tapered to the centre.  Then I cut the curve on the bandsaw.


Now I could put the leg back on the bending form and glue the last strip to the inside.  This gave me an unbroken surface on both the inside and the outside of the leg.  Probably not necessary on a prototype but it just looks better, and maybe a little stronger too.  My plan for the actual table is to taper each strip from 1/4" to 1/8" before gluing them together.


I built this jig to hold the leg arches in place so I could line up, mark, and cut the 2 joints where the legs intersected.  It was long enough to offset them a bit and work my way in.

To me this joint is the heart and soul of this table, the thing that makes it unique.  And it did not turn out at all like I expected.  In my mind's eye, before I built this prototype, the surfaces of the two arches would cross in basically the same plane.

Please ignore the terrible joinery.

As you can see that is not the way it actually worked. The surfaces were not even close to being co-planar.  In fact, it is hard to imagine that they could be any further out than they were.  It kind of threw me for a loop.

I pressed on anyway, mostly because I needed a project for the Guild's 2 x 4 challenge.  I didn't quite get it finished in time but it was close enough.  When I showed it to the Guild everyone seemed more intrigued by the lattice top than the legs, which kind of surprised me.

If this blog entry seems to end rather suddenly it is because I have been trying to write it for six months now.  It has happened in bits and pieces here and there and none of it really feels right.  There is something I want to say about this table but I can't figure out what it is.  Anyway, it has held me up long enough.  Time to move on.