Showing posts with label handwork. Show all posts

Saturday, 27 August 2016

This Is Called An Incomplete Success

This piece was inspired by the work of Raney Nelson of Daed Toolworks.  The methods used are derived from his description which was posted on his blog.  Anything that is wrong is probably due to my interpretation.


I don't mean to run out of time.  It just seems that I can never allow for how slowly I work.


This project started because of the Guild's annual 2 x 4 challenge, to make something, anything, from a standard 8' piece of 2 x 4 lumber. (See my previous attempts here and here).  This year the projects were to be presented at the April meeting instead of the the one in march.  With an extra month, I was sure to have lots of time.

One of the things I like about this challenge is that you are forced to work with limited resources. Everything must fit within the dimensions of this one board, and it forces you to plan your use of materials carefully.  I usually find myself using offcuts that would normally be thrown away in order to get enough of a particular piece.

I started out by cutting the legs from the 2 x 4.  The legs are triangular in section and I tried first to make them on the table saw.  I angled the blade to 30 degrees and made the first cut just fine.  Then I flipped the board over and moved the fence over so I would cut out a 60 degree angle to make a leg. By the time I was about 12 inches into the cut however, the saw was starting to fight back.  It was binding, wandering, and just refusing to cut.  I decided it was about time I cleaned the blade.  This helped tremendously for about 6 more inches, then it was back to the fight.  I gave up quickly this time and did the rest of the angle cuts on the band saw.  I don't know why, but my cheap table saw just doesn't like angles.


After the frame components had been roughed out the next step was to make the strips for the lattice. The exact height and width of the strips isn't really important, as long as they are consistent.  You also need to be able to easily divide the height of the strips by three.  I used three pieces of 1/4" hardboard as the height of my strips.  Having physical 1/3 pieces is important, as you will see later.


My next task was to cut my strips on the band saw and then plane them to the finished width.  The easiest way to get them all to come out the same thickness was to use a jig.


3/4" plywood base, 3/16"plywood strips on that, just far enough apart for the plane blade to get between them.  In between is a cardboard shim topped with 80 grit PSA backed sandpaper to keep the strips from moving around.  two more wooden strips on top to guide the plane and keep the blade between the plywood strips.


A screw at the end acts as an adjustable planing stop.  Was I worried that the blade would hit the screw? Yes.  At first. It took me about half a dozen strips to settle down and plane with confidence.


The plane that I used was the one I made using the Lee Valley kit, with the adjuster removed.  I have to brag a bit because the plane worked perfectly.  It's hard to check for the grain direction on thin strips of spruce and I quickly gave up trying, but it didn't matter, the plane took great shavings either way.  There were about 30 of these strips to thickness, and this was the most use I have made of this plane since I built it.  In the process, I learned a couple of things.  The first was to be careful with my knuckles when I use this plane.  Those red spots by the adjuster are blood that leaked out when I caught them on the edge of the guide strip.  The second, more important, lesson was how a small,  unhandled smoother should be held.  I have grown up in a world where handplanes were defined by Stanley planes, with rear handles and front knobs.  I never really 'got' the unhandled infill planes from an ergonomic point of view.  Now that I understand the way they are meant to be held they make a lot more sense.
Before & after thickness.
With the strips all planed I needed a way to cut them at a consistent 60 degree angle.  Custom built miter box to the rescue.


The overall length is 36", so the 20" long strips would not overhang so much that they would tend to fall off.  Why are the sides only 30"?  Because the piece of baltic birch plywood I cut them from was only 30" long.  Why is the miter slot off center?  Because I needed the extra room at one end for an alignment block which you will see later.  Why is there only one angle instead of opposing angles? Because I took this picture before I cut the second angle, and it's a good thing I did, because it took me a couple of tries to get it right and you can't see the mess I made.


Here you can see why you need to have to have something that is 1/3 of the total thickness, or in this case 2/3.  I am using the hardboard to set the depth of cut for the saw so it will stop when I have cut 1/3 of the way through.  The spring clamps are not the most secure clamps in the world but they are light and it doesn't require a lot of pressure to cut through the spruce.  There is a lot of sawing ahead and it is best not to have too much weight on the saw.


Before I can start making cuts I need to know where to cut.  I made a little marking gauge to guide the knife for the left cut.


An offcut of one of the strips is used to mark the right side of the cut.  When the cuts are made the left mark has to line up with the left side of the saw kerf.  The right mark aligns with the right side of the kerf.  That way the opening is just wide enough for another strip to fit in.

It may seem a little strange but after all this work I still didn't know for sure that this was going to work, so I decided to do a test joint before diving right in.  The first cut was set to cut 1/3 of the way through, the flipped to make a cut 1/3 through from the opposite side.  Because of the flip, the two cuts wind up at opposing angles.  Reset to cut the right side, and remove the waste with a chisel.


This is the result.  The next cut is a little trickier.  You cut 2/3 deep in one direction (120 degrees) and then 1/3 deep in the other direction (60 degrees).


When you combine these two it starts to make sense.


The last piece is cut to 2/3 depth in both directions so that when you turn it over it slides neatly into the joint.


First try.
Giddy with success I dove in to the full project.  I laid out marks on 2" centers and knifed them on the edge of a strip, along with the marks for the right hand cut.  Then I lined it up in the miter box as before, but this time I added a stop block, also cut at 60 degrees, and wedged it into place.


Now that my distance was set I could add the rest of the strips that needed the same cut and wedge them into place.


This way I could cut all 9 strips at once.  It saves a lot of time, rather than having to mark and cut each strip individually.


After that it was a lot of remove the wedges, reset, repeat.  The actual saw cuts take only a few seconds, but setting up each cut was tedious.  You can see from the picture, too, that small errors start to pop up.  I told myself that these would just help to lock everything together at assembly time and pressed on.  Once all the cuts were made I removed the waste with a narrow chisel.


The rest of the strips required cuts in both directions so I modified my marking gauge by cutting the opposing angle on the other end.  I also notched the offcut strip to fit around the strip I was marking to make it a little easier.


When all the cuts were made I took a deep breath and started to put them all together.  All in all, it turned out pretty good.


For those of you who are into numbers, there are 81 three way lap joints, each requiring 12 saw cuts, for a total of 972 cuts.  Admittedly I cheated by doing 9 at a time, so it's really only 108, but still...

My plan was to build a triangular stand with the top and a shelf both made from the lattice.  The top lattice would be a little larger than the shelf.  


I wanted to complete the top lattice by including the asa-no-ha (hemp leaf) patterns.  When they are arranged in circles they resemble flowers.  This required building one more jig to taper them to the proper angle.


The angle is cut at 30 degrees.  Taper one side of the strip, flip it, and taper the other side.  This results in a 60 degree point that fits neatly into the corners of the triangles.  I measured the length of the leg of the triangles, did some math, and came up with a length of about one inch for each leg of the hemp leaves.  Tow of the legs are formed by a two inch long strip that is cut nearly in half.


I actually went a bit too far with this cut, but it held.  The third leg of the leaf is about one inch long and tapered to a point at one end but only tapered down to the width of the saw kerf at the other end.


When you put the two together it should all fit nicely.


In reality there is a bit of trial and error in getting the lengths just right.  As usual I was starting to run out of time and I had to just get things done.  It still looks good from a distance, but up close it's a little sloppy.


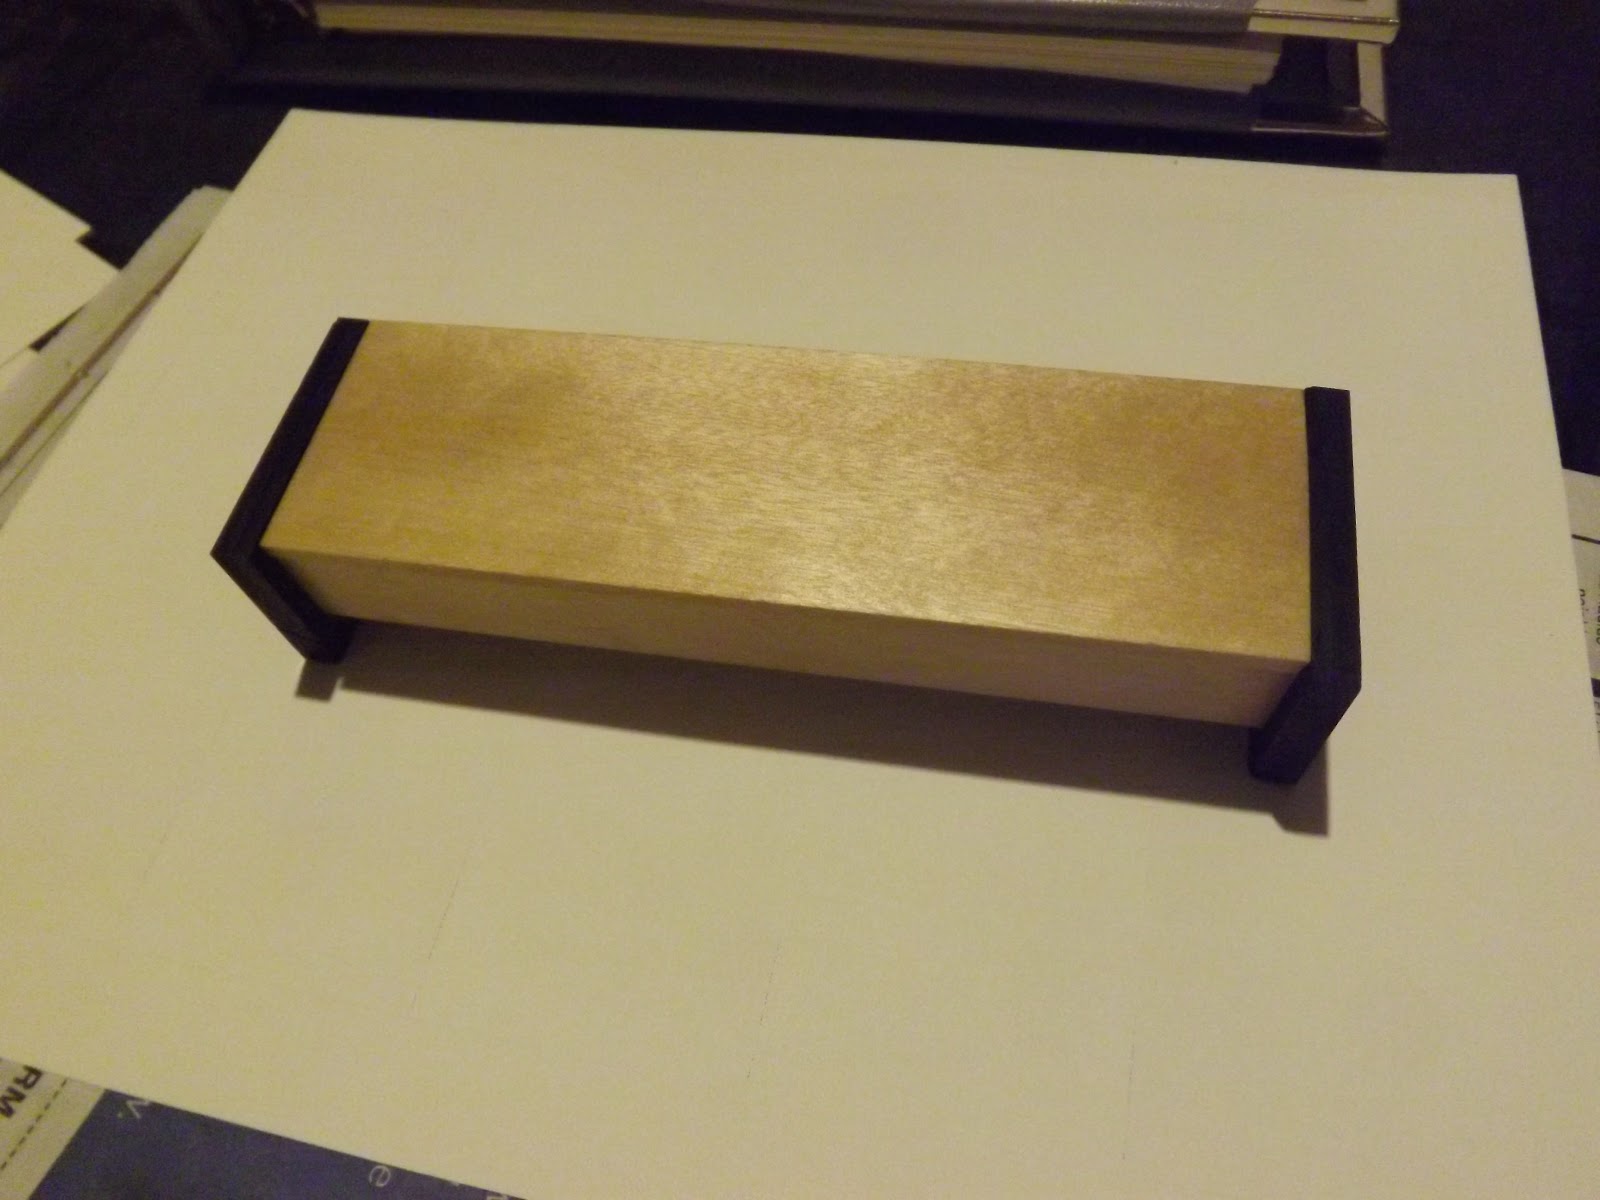
I'm not going to bore you with details of building the stand because this post is long enough already and, really, it turned into kind of a disaster.  I was out of time and it was just an ugly design anyway.
In the end all but the top went into the scrap pile.  At least that part was nice enough that my wife wanted to keep it around.


Tuesday, 5 July 2016

Gramercy Tools Bow Saw Kit: Sort of a Review

A couple of years ago I used the Lee Valley gift cards I got for Christmas to purchase a Gramercy Tools Bow Saw Kit.  I wanted it partly because of the limitations of my band saw (3" max. cutting height) and partly because I am a sucker for anything that I can use to build a tool at home (See plane, spokeshave).


The kit hardware consists of two handles, brass pins that go into the handles, and three blades.  There are measured and full scale drawings along with some construction notes that offer helpful advice but no step by step instructions.  The lack of instructions may take this out of the 'beginner' class, but it is still a pretty straightforward project.  I didn't see any drawback to not having detailed instructions.

Even so, I did go online and check out other bow saw builds and it did yield some useful information. The most significant item was actually a note that I had planned to ignore.  In the drawings the spot where the crossbar and the arms meet is curved.  In the notes it says "Since our saws are made on automated production machinery it's pretty easy for us to do.  If you are working by hand, squared up mortises, tenons, and faces are the way to go."  I, of course, took this as a challenge.  I could curve my shoulders as well (almost) as any machine.  What I saw online changed my mind.  A couple of people had tried it and got the curve wrong.  It didn't wreck the saw but it just looked wrong.  I decided to leave mine flat.

The handles that came with the kit were hickory but I didn't have any of that so I went with beech instead.  In order to make the cross bar as strong as possible I wanted it to be quartersawn. Fortunately my flatsawn beech was thick enough that I could get the crossbar out of it.  I marked the quartersawn grain on the board and cut along one line to avoid runout as much as possible.


Did I mention that I ran the bottom side of the board over my jointer first?  I did that so I would have a reference surface.  After that, I could do the rest of the squaring up with a hand plane.  Eventually I wound up with a very nice stick.  This may not seem like a big deal to you but I am still kind of new at using hand tools and making something flat and square is a big deal to me.


I followed the same procedures and made two more sticks for the arms, except I had to leave them flatsawn because of their width.  Then I glued photocopies of the full scale drawings on to them as a guide for cutting the rough shape.  Before actually cutting them out though I drilled the holes for the pins and made the mortises for the tenons on the cross bar.


  It was a lot easier to do this while everything was still square.  This was another thing I learned from the internet.  I like to think that I would have thought of this on my own, but...

The next step was to cut the tenons on the crossbar and check it for length.  I did this by putting the pins in the arms and installing a blade, then putting the crossbar in place and squaring one side.


If the length was right then the other side would be square as well.


Of course it wasn't.  If you've read my blog before you would expect that.  At least it was still too long.  A couple more tries and it came out right.

Once the crossbar was right I cut the arms out with my wife's scroll saw.  If I had already had a bow saw I would have used that, but then there would be no need to build a bow saw.


If you are good with a scroll saw you can get a pretty good finish from it but I need a lot more practice before I can do that consistently.  Fortunately I cut a little off the line which left me some room to smooth things out.


The next step was to taper the upper part of the arms.  I had expected difficulty in getting a nice, consistent taper but I used my block plane an was surprised how easy it was.  I just started near the top end and worked my way back, and was able to adjust the angle easily by changing where I started my stroke.


When it was time to move to the other side I put a wedge under the back end so that the first side had  support for the whole length.  After that it was just a matter of chamfering the edges and shaping the bottom end to finish the arm.


There is something about the process of shaping wood that I find to be deeply satisfying,  I can't really explain it, but using rasps and files to soften a corner or create a cove simply feeds my soul in some way.

The chamfers on the crossbar were not quite as straightforward because they were wider in the middle and tapered away as they approached the ends.  I made a template for the curve by marking a straight line on a piece of cardboard and then putting nails in separated by the length of the chamfer.  I then bent a strip of wood so that the bend matched the bend of the chamferand marked the curve.


I then cut along the curve and bent the cardboard along the line and marked the chamfers.


Then it was just a matter of chamfering to meet the lines.


The last part to make was the toggle for tightening the string.  The instructions were to turn a toggle and taper opposite sides, but I just made mine from a square piece of beech.


At this point all that was left was to assemble the saw and tension it.  Wait, where's the string?  If you remember the start of this post, there was no mention of any string in the kit contents.  Actually, part of the reason it took me two years to start building this kit was that there was no string with it.  For what I paid for this kit I really think I should have gotten some string.  You can buy the string separately on their website, but it still doesn't come with the kit.  As a woodworker, I think I would have rather had string than the handles.  I can make wooden handles.  By the time I was done building this saw I was pretty worked up up about the whole matter.   I was ready to trash Gramercy and the saw and everyone associated with it.

So what stopped me?  Well I went out and bought some string and actually tried the saw.  It was, to put it simply, a delight.  The saw is surprisingly light and nimble.  It cuts great.  It feels good in the hand.  All my angst about the string melted away as I made the first cut through some 2" thick beech.


It also gave me a chance to try out the new branding iron that I got for Christmas.


So, overall, I'm pretty happy with the saw.  I still think it should come with string, though.

Tuesday, 18 June 2013

No Electrons Were Harmed...

...In the making of this pen box.


There it is, my first totally by hand, no power tools, no sandpaper project.  All the cuts were made by handsaw, the surfaces smoothed by planes and scrapers.  Modern form, traditional methods.

I started off with a block of maple and and a piece of Brazilian rosewood (thanks to my local Windsor Plywood for the clear labelling).


The biggest part of this project is cutting everything to size.  I started off by cross cutting the maple to length.  Once that was done I wanted to smooth and square up one end. My biggest fear was that I would not be able to do the end grain. I had never done it before.


Wow.  End grain shavings.  From maple.  So cool.  This sort of thing excites me.  I had to show my wife.  While she may not quite share my excitement over end grain shavings, she does understand the feeling of trying something new and succeeding.  Just one of the reasons why I love her.

 Next came a rip cut to get the blank to rough thickness.  Before, I always did my rip cutting with the table saw or the band saw.  I found that even on a small piece like this I had to do it in stages. I am really getting out of shape.


Yes, I am using a Japanese style ryoba saw.  I have been pretty happy with this saw.  It works for both rip and cross cuts, and the lack of a spine means it can cut through material that is thicker than width of the blade.  It also means that the blade is more prone to vibrate as you cut if you get too carried away, so it pays to take it easy sometimes.  And yes, I realise as I write this that I put the wrong set of teeth in the kerf to take this picture.

After planing down all six sides I was left with this nice, smooth little block of wood.  All of the sides were as close to square as they would ever be.


My next move was to take my marking gauge and mark a line just over 1/8" down from the top all the way around the blank.
 
 
And then cut the top off.  Look, I'm using the right teeth and everything.


And I am following the line.  That may not seem like such a big deal to some, but you probably haven't tried to do it.  Actually I have been working at my accuracy for a while, mostly on crosscuts, and I am getting better.  Taking breaks to take pictures and other things helped me to maintain my concentration.  A light touch and a lot of patience (as in "don't push too hard, let the saw do the cutting") helped too.
 
 
 Here it is with the lid cut off.  There are some bad scratches near the start, but the rest of the cut was remarkably smooth.  I had cut the lid just a little thick so the scratches planed out with no problem.  I was feeling pretty pleased with myself at this point.  The cut was smoother than anything I had ever been able to do with a power saw.
 
 
The next step was to cut a 3/8" strip off the back side of the main block to act as a hinge for the lid.  Again, this cut turned out very well, better than the last even.  I carried on by cutting the sidewalls from the rosewood.
 
I wasn' t comfortable with the idea of just gluing the sidewalls to the ends of the body because end grain glue joints are notoriously weak, even for a light duty piece like this.  I also needed a pivot for the hinge for the lid.  The solution to both problems turned out to be 1/8" dowels.  Lining up the holes, though, was too precise a job to be left to something as inaccurate as measuring.  my solution was to use small nails to mark the spots where they went.

 
I drove the nails in and then clipped the heads off with pliers.  I also glued the lid to the hinge so that everything would be in place to mark the holes on the sides.
 

Here is the way I transferred the marks.  The lid is upside down on the jointer table with the back of the hinge against the fence.  The body of the case is upside down on top of it.  The sidewall is placed next to them and then a block, which protects the sidewall from being dented by the mallet.  A few sharp taps with the mallet and the ends of the nails have marked the inside of the sidewall.

 
After pulling the nails out it was time to drill all the holes.  But how to do it?  I do own a brace, but it was way too big and too aggressive for this work.  Besides, it wouldn't hold a 1/8" bit. I considered going out and buying a hand drill, but I am too cheap for that.  Here is my solution.
 
 
It's the tap wrench from my incredibly cheap tap & die set.  At least something from that set has turned out to be useful.  If you look really close you can see the holes in the sides.


 Now it was time to make the groove in the body to hold the pen.  There were lots of ways I could have done this but I wanted to try my #45 combination plane.  I have had this plane in my shop for a few years now and have never used it, so I sharpened a 5/8" wide blade and gave it a try.  On a piece of scrap first.
 
 
I have to say I can see why these planes had so much appeal and why nobody makes them any more.  The extreme versatility of this plane makes it seem like such a good idea.  The wide selection of blades available and all the adjustability make it seem like this plane can do almost anything.  When these planes first came out they must have seemed like a great way to save money.  When the metal hit the wood, however, the other side of this plane was revealed.  It was heavy to use, I assume it was a lot heavier than the wooden planes it replaced.  The big problem I had with this plane though was setting the blade.  I simply could not get a decent shaving from this plane.
 
 
Another problem I had with this plane, although it wasn't really the plane's fault, was that I had trouble keeping it upright.  The result was that I had one sidewall of the groove that was pretty bad until half way down, where I figured out what the problem was.
 
 
Once I held it straight the side was just fine.  I smoothed it out using a float.  Back to the nice, fluffy shavings.
 
 
Now it was time to cut the 1/8" dowels to hold things together.
 
 
After a test fit I cleaned up the end grain of the sides a bit. 
 
 
End grain shavings from rosewood. Still a thrill.  All that was left was to put it together.  Here's a couple of shots of the completed piece, with a mineral oil & beeswax finish.


I have to say, this was a really satisfying project.  I feel like I have gained a lot of confidence in my ability to work with hand tools.  Not that I'm selling my power tools or anything like that, but I will have no problem increasing the amount of work I do by hand in future projects.