Friday 27 September 2013

Turnips of Destiny Reach Their Destination


It's embarrassing to admit that it has been over a year since I made this post about a couple of finials I made to top the gate posts outside our house.  Finally though I have them in place.

Because the finials were a little smaller in diameter than the width of the posts I needed to taper the tops of the posts so they wouldn't look silly.  A straight taper wouldn't look right either, and that would have been too easy.

The round tenons at the bases of the finials are 1" in diameter.  I allowed 1/4" on either side. which made the top 1 1/2" wide.  since the posts are 3 1/2" wide, that left 1" on either side for the taper.  With the width set I picked 6" for the height, made a grid, and used my French curves to sketch a few profiles.


It quickly became clear that 6" was too tall and 4" was too short. 


After trying a few different curves I chose the last one on the right. The next step was to cut a piece of cardboard from the side of a cereal box and fold it in half.  Then I glued my curve to one side and cut along the curve. I left tabs at the top and glued them so they were at 90 degrees to each other to make my template.


I cut the posts off at 7" above the top of the fence and then used the template to mark the curves.


Here is the post after the first cut with the coping saw.  A coping saw is not really the right tool for this job, and I hate my coping saw to begin with.  Over the course of the next seven cuts I broke 2 blades.  Did I mention that I hate my coping saw?

I smoothed the surfaces with a Microplane rasp and sandpaper, then drilled 1" holes in the tops of the posts.  I glued in the finials and finished the job with white stain.  Now if you come to visit these posts will welcome you to our house.


Saturday 31 August 2013

Practice Makes a Bunch of Stuff

So I spent some time sharpening my turning skills.  Nothing too exciting, but I spent some time doing it so I will show what I have been up to.


This little scoop is made from beech.  The trick to making these is to make the little ball on the end as close to a perfect sphere as possible.  Then you can mount it in the jaws of the chuck with the handle sticking out to the side between the jaws and hollow the centre.
 
 
A small dish made from walnut burl.
 
 
I like the effect of burls.  At its best, the wood appears to be boiling and frozen at the same time.
 
 
This dish was made from a branch from a mountain ash tree that grew in my back yard.  It was cut through at a point where two smaller branches came off.
 
 
The nice thing about this wood is that it is very stable so you can do end grain turnings with it and not have to worry about it developing a bunch of checks.
 
 
Same branch, natural edge with the bark left on, side grain.  Both pieces were finished with mineral oil & wax.
 
 
More pens made with Amazing Casting Resins.  The pen on the left is made with the clear cast and shavings.  The other three are made with the 10 minute resin.

 
This pen and pencil are linked.  The pencil was made with shavings left over from the pen.

 
 Just to be different, I made a pen and pencil from actual wood.  they are finished with Hutt wax and pen polish.
 
I do think that practising turning helps to improve my skills.  The only problem is that now I'm tired of turning for a while and want to move on to other things.  It's this scattered approach that keeps me from really developing my skills.  It's all just so much fun.


Friday 2 August 2013

Bobble Bowl

 
I have finally completed the bowl that I started back in March at the Matisho Memorial.  Almost as soon as this bowl came apart on the lathe I knew that I was not done with it.  There was too much time in it to let it go.  I just needed a little time away from it to settle down.  Everyone who has done some turning knows what it feels like to have something go to pieces in an instant.  Over time, I decided that I wanted to use this bowl to try to capture that moment.

I was relatively lucky that the bowl split into three relatively large pieces, and that those pieces were not damaged further as they flew off the lathe.  I sanded the pieces with a bowl sander.  Since I couldn't spin the bowl on the lathe and move the bowl sander around with the drill as I would normally, I chucked the sander in my drill press and moved the pieces around against it to sand them.


Once all the pieces were sanded to 400 grit I gave them a couple of coats of mineral oil and wax finish, then buffed them with Hut Perfect Pen Polish to give them a nice gloss.  Here they are, ready to be assembled.  The wood is from an apple tree that used to grow in my front yard.


For almost the whole time that I was planning this bowl I was going to use Amazing Casting Resin to make clear rods to connect the pieces.  Now that the time had come to make and use them though I was having doubts.  I worried about the strength that they would have.  I had a vision of someone putting something a little too heavy in the bowl and the sides just flopping down as the acrylic rods (or the wood around them) gave way.

It was this vision, though, that inspired the path that I finally chose.  I ran down to my local big orange hardware store and bought these.


1/4" x 1 1/2" springs.  I had been hoping to give the bowl a sense of motion, that you would be seeing it just as it came apart on the lathe. With the springs I could give the bowl some actual motion.  I drilled 2 holes in each side if the base and 2 (sort of) matching holes in the wings.  After trimming the springs to adjust the spacing I glued them into the holes with 5 minute epoxy.  Here are some shots of the result.


I like this one.  It looks like some sort of prehistoric crab.
And some that are a little more 'artsy.'


If you go by the axiom that "if it holds water it's a craft, if not it's art," then this qualifies as art.  Since works of art usually have names, I have decided to name this one 'That Moment' because, as I said at the top, every turner knows what that moment feels like.  More likely though, it will always be thought of as the 'Bobble Bowl.'


Wednesday 17 July 2013

Blast(er) from the Past

The other day my son asked me to play Star Wars with him.  Since he had actually left the house and come outside to play it was hard to say no.  He had his clone trooper helmet and blaster rifle with him, but I had nothing.  "Give me five minutes," I said, and he did.  I used the time to knock this together from scrap.


So we ran around the back yard for a while making laser sounds, diving for cover, yelling "Got you!", and just having fun.  The whole time though, I was having a serious flashback.

I was eleven when Star Wars first came out, just a little bit older than my son is now.  I don't think that kids today can appreciate just how groundbreakingly different that movie was.  I was totally blown away the first time I saw it, and obsessed with it from then on.  Later that summer I went to visit my cousin for a few days, and of course we went to see it again.  Later, he revealed to me one of his greatest treasures, a wooden 'laser pistol' my uncle had made for him.  It was very much like the one in the picture above, except I think it was made from hockey sticks.  I offered all sorts of things in trade, but he wouldn't go for it.

I was determined to have one of my own though.  When I got home I made a plan.  I waited until Dad was out in the field, snuck into his shop, and fired up the table saw to make my own.  How I managed to do it without cutting my fingers off is a mystery to me, but I did it.  And, I might add, it was waaay better than the one my uncle made.  And better than the one I had just made.  Ironic that I did better job at eleven than I did at forty-seven.  In defense of my older self I spent a lot more time on it when I was eleven.

I went on to make a lot more laser guns, machine guns, and rifles.  They stayed behind when I left the farm and eventually disappeared.  I blame my nephews.  Now, though, when someone asks me how I got started in woodworking, the answer is 'Star Wars.'

Tuesday 18 June 2013

No Electrons Were Harmed...

...In the making of this pen box.


There it is, my first totally by hand, no power tools, no sandpaper project.  All the cuts were made by handsaw, the surfaces smoothed by planes and scrapers.  Modern form, traditional methods.

I started off with a block of maple and and a piece of Brazilian rosewood (thanks to my local Windsor Plywood for the clear labelling).


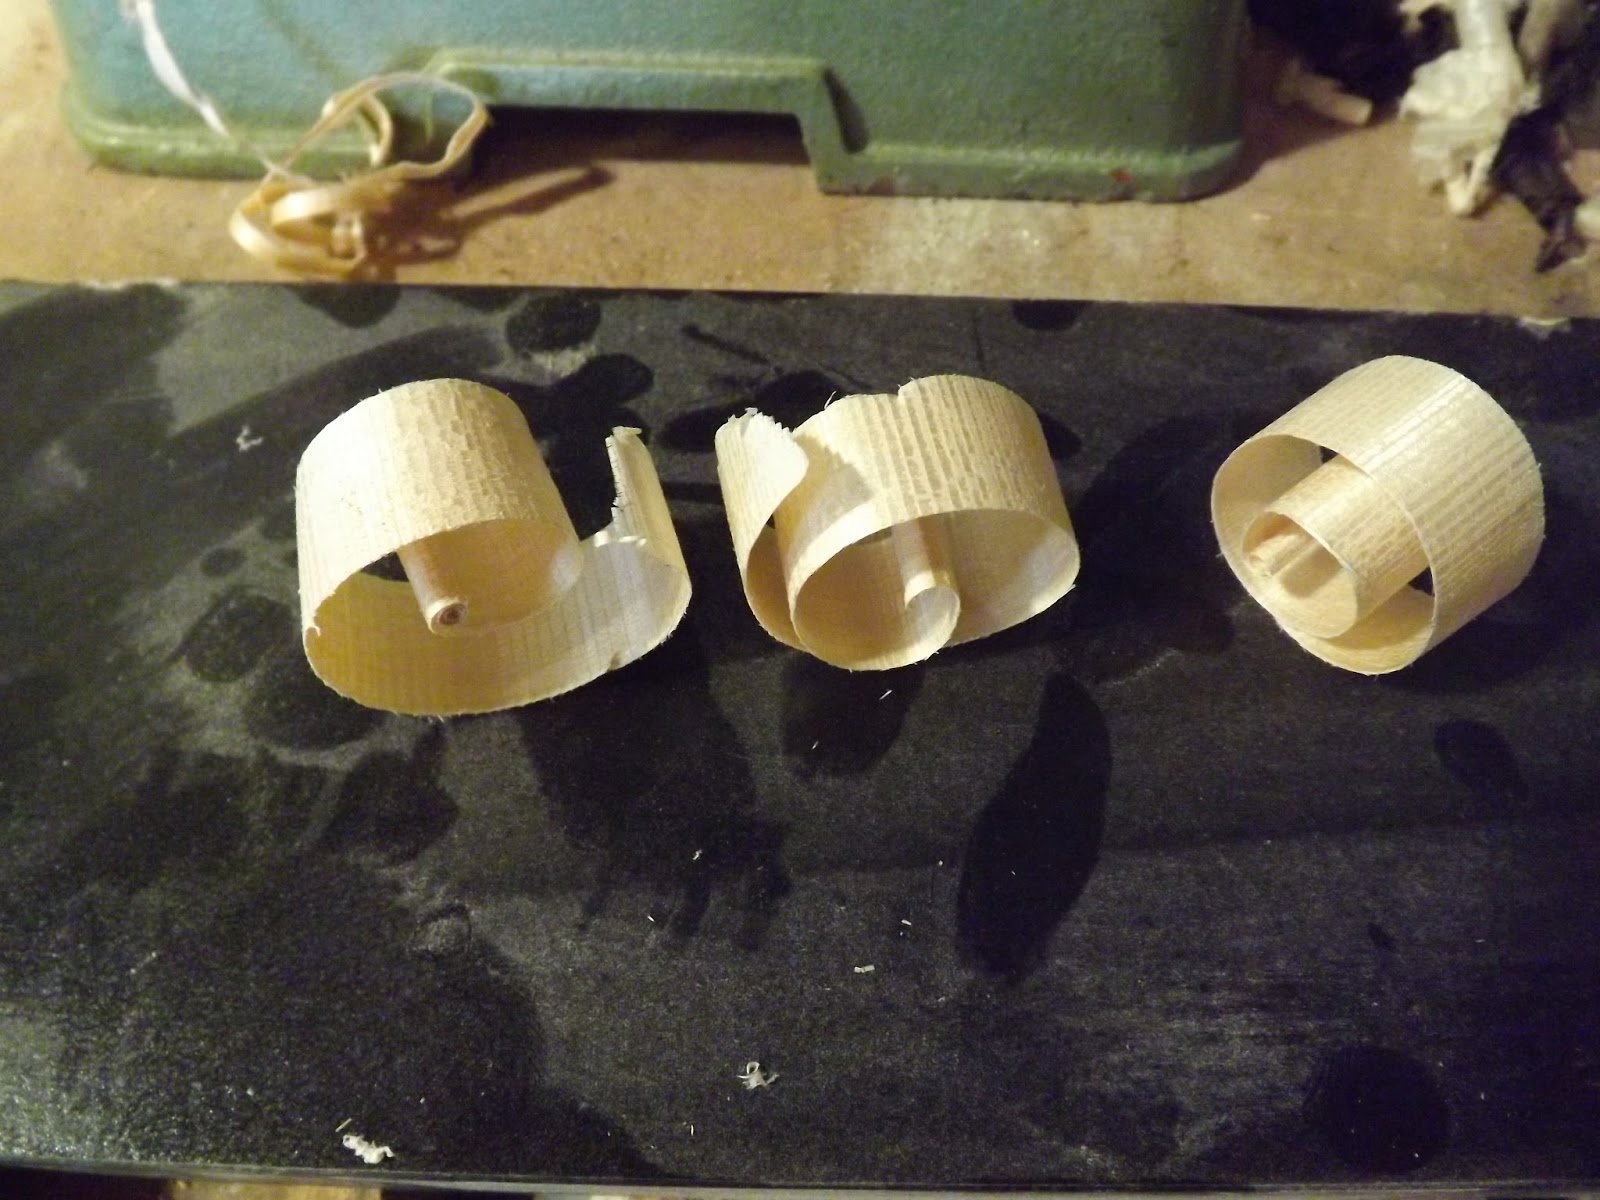
The biggest part of this project is cutting everything to size.  I started off by cross cutting the maple to length.  Once that was done I wanted to smooth and square up one end. My biggest fear was that I would not be able to do the end grain. I had never done it before.


Wow.  End grain shavings.  From maple.  So cool.  This sort of thing excites me.  I had to show my wife.  While she may not quite share my excitement over end grain shavings, she does understand the feeling of trying something new and succeeding.  Just one of the reasons why I love her.

 Next came a rip cut to get the blank to rough thickness.  Before, I always did my rip cutting with the table saw or the band saw.  I found that even on a small piece like this I had to do it in stages. I am really getting out of shape.


Yes, I am using a Japanese style ryoba saw.  I have been pretty happy with this saw.  It works for both rip and cross cuts, and the lack of a spine means it can cut through material that is thicker than width of the blade.  It also means that the blade is more prone to vibrate as you cut if you get too carried away, so it pays to take it easy sometimes.  And yes, I realise as I write this that I put the wrong set of teeth in the kerf to take this picture.

After planing down all six sides I was left with this nice, smooth little block of wood.  All of the sides were as close to square as they would ever be.


My next move was to take my marking gauge and mark a line just over 1/8" down from the top all the way around the blank.
 
 
And then cut the top off.  Look, I'm using the right teeth and everything.


And I am following the line.  That may not seem like such a big deal to some, but you probably haven't tried to do it.  Actually I have been working at my accuracy for a while, mostly on crosscuts, and I am getting better.  Taking breaks to take pictures and other things helped me to maintain my concentration.  A light touch and a lot of patience (as in "don't push too hard, let the saw do the cutting") helped too.
 
 
 Here it is with the lid cut off.  There are some bad scratches near the start, but the rest of the cut was remarkably smooth.  I had cut the lid just a little thick so the scratches planed out with no problem.  I was feeling pretty pleased with myself at this point.  The cut was smoother than anything I had ever been able to do with a power saw.
 
 
The next step was to cut a 3/8" strip off the back side of the main block to act as a hinge for the lid.  Again, this cut turned out very well, better than the last even.  I carried on by cutting the sidewalls from the rosewood.
 
I wasn' t comfortable with the idea of just gluing the sidewalls to the ends of the body because end grain glue joints are notoriously weak, even for a light duty piece like this.  I also needed a pivot for the hinge for the lid.  The solution to both problems turned out to be 1/8" dowels.  Lining up the holes, though, was too precise a job to be left to something as inaccurate as measuring.  my solution was to use small nails to mark the spots where they went.

 
I drove the nails in and then clipped the heads off with pliers.  I also glued the lid to the hinge so that everything would be in place to mark the holes on the sides.
 

Here is the way I transferred the marks.  The lid is upside down on the jointer table with the back of the hinge against the fence.  The body of the case is upside down on top of it.  The sidewall is placed next to them and then a block, which protects the sidewall from being dented by the mallet.  A few sharp taps with the mallet and the ends of the nails have marked the inside of the sidewall.

 
After pulling the nails out it was time to drill all the holes.  But how to do it?  I do own a brace, but it was way too big and too aggressive for this work.  Besides, it wouldn't hold a 1/8" bit. I considered going out and buying a hand drill, but I am too cheap for that.  Here is my solution.
 
 
It's the tap wrench from my incredibly cheap tap & die set.  At least something from that set has turned out to be useful.  If you look really close you can see the holes in the sides.


 Now it was time to make the groove in the body to hold the pen.  There were lots of ways I could have done this but I wanted to try my #45 combination plane.  I have had this plane in my shop for a few years now and have never used it, so I sharpened a 5/8" wide blade and gave it a try.  On a piece of scrap first.
 
 
I have to say I can see why these planes had so much appeal and why nobody makes them any more.  The extreme versatility of this plane makes it seem like such a good idea.  The wide selection of blades available and all the adjustability make it seem like this plane can do almost anything.  When these planes first came out they must have seemed like a great way to save money.  When the metal hit the wood, however, the other side of this plane was revealed.  It was heavy to use, I assume it was a lot heavier than the wooden planes it replaced.  The big problem I had with this plane though was setting the blade.  I simply could not get a decent shaving from this plane.
 
 
Another problem I had with this plane, although it wasn't really the plane's fault, was that I had trouble keeping it upright.  The result was that I had one sidewall of the groove that was pretty bad until half way down, where I figured out what the problem was.
 
 
Once I held it straight the side was just fine.  I smoothed it out using a float.  Back to the nice, fluffy shavings.
 
 
Now it was time to cut the 1/8" dowels to hold things together.
 
 
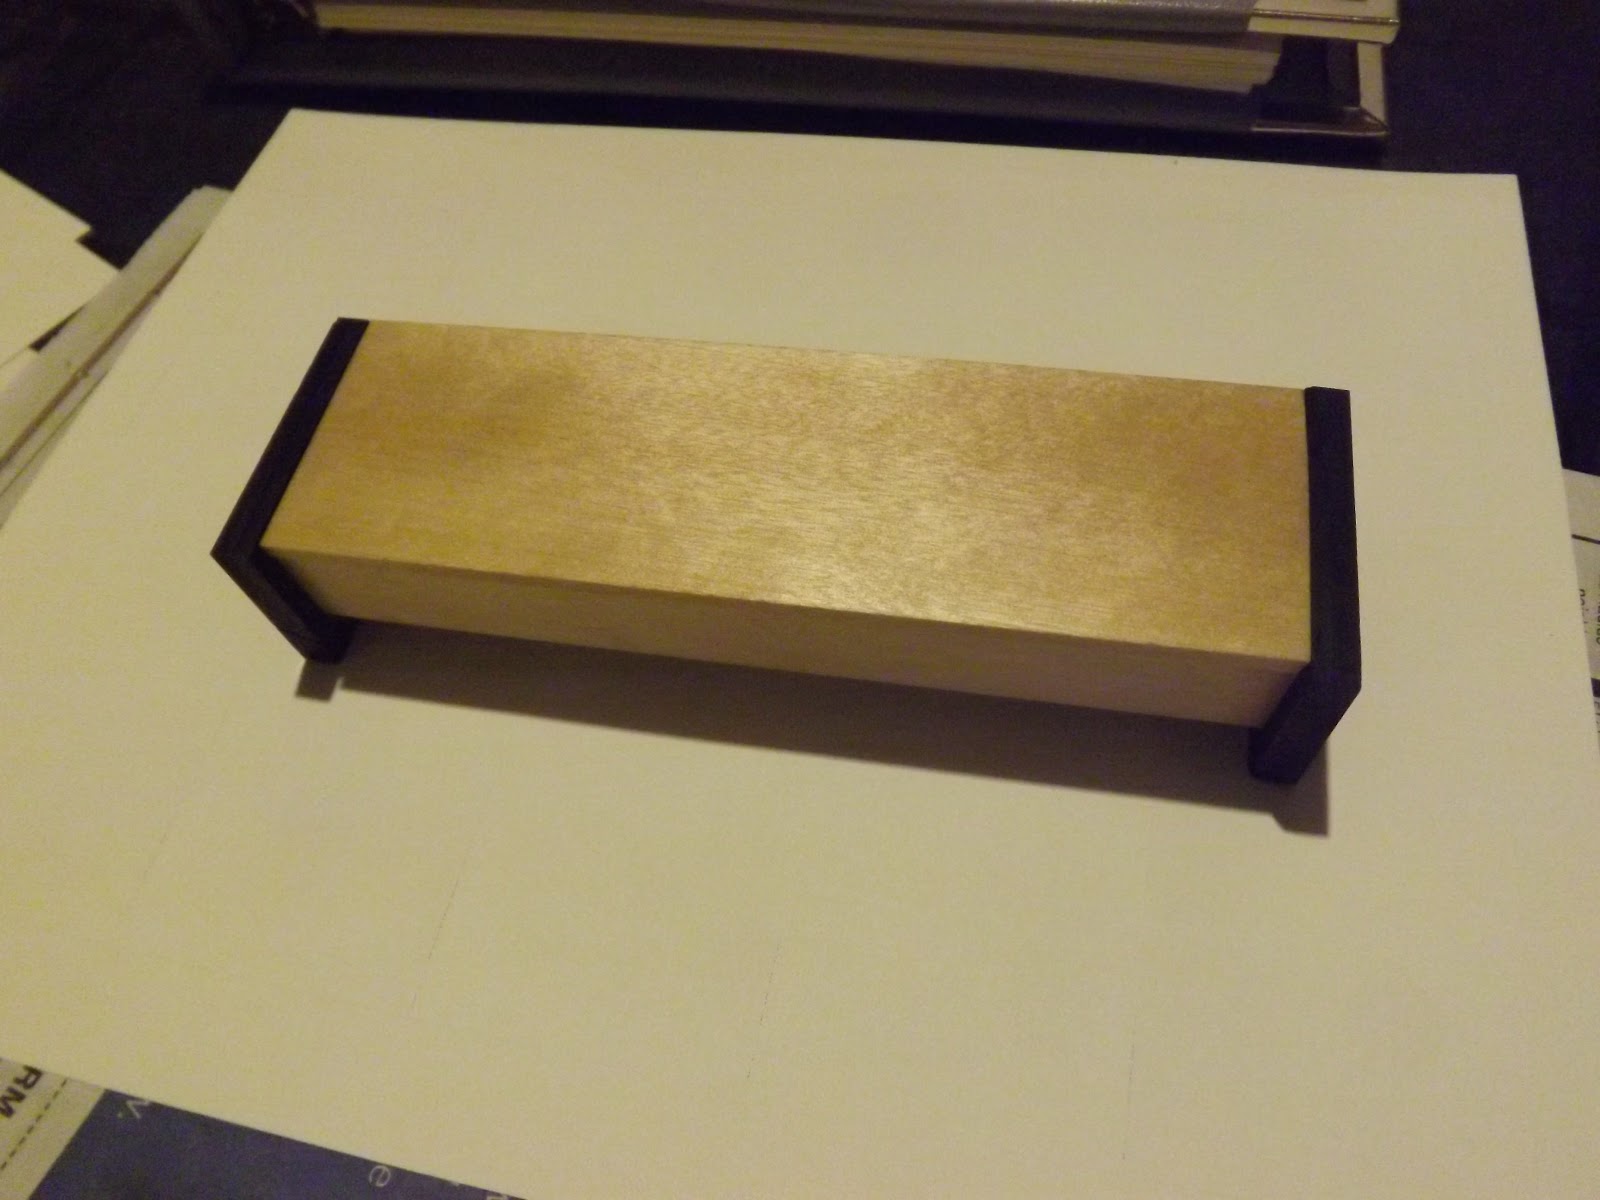
After a test fit I cleaned up the end grain of the sides a bit. 
 
 
End grain shavings from rosewood. Still a thrill.  All that was left was to put it together.  Here's a couple of shots of the completed piece, with a mineral oil & beeswax finish.


I have to say, this was a really satisfying project.  I feel like I have gained a lot of confidence in my ability to work with hand tools.  Not that I'm selling my power tools or anything like that, but I will have no problem increasing the amount of work I do by hand in future projects.