When I started this blog I did it for two reasons. The first reason was to have a record of how I did things that I could go back to so I could remember how I did things and hopefully prevent repeating the mistakes. The other reason was the hope that by writing about it I could start to understand why I do what I do, and that this clarity would help me to improve my woodworking. This post is all about reason two.
A while ago I was reading the Lost Art Press Blog and came across this essay attempting to define the difference between the terms artist, artisan, and craftsperson. It really made me think about these labels and how I felt about them. You should read it now, and then come back to this, as it will help to make sense of what I have to say. It is neither a long or nor difficult read. Go ahead... I'll wait...
Done? OK, here they are, my definitions of the terms artist, artisan, and craftsperson:
Artist - One who creates original works for the purpose of self expression.
Artisan - One who creates original works for practical purposes.
Craftsperson - One who creates works based on the designs of others.
I want to point out that to me these distinctions have nothing to do with skill. I think that if you asked each of these types of people to build a chair, the craftsperson would be the most likely to succeed, the artist the least likely. The craftsperson would draw on previous designs to build something solid, comfortable, and attractive. An artisan would probably build a solid chair, but their original design may not be as comfortable as some existing designs or the design may not be appealing to as many people. The artist may not even consider those things to be important in comparison to what they are trying to communicate to someone looking at it.
What is important to these definitions is the idea of originality. If I were to see a pattern in the inlay around the edge of a coffee table and reproduce it in a segmented bowl am I being original? If I come up with one original idea, does that move me from craftsperson to artisan? The lines start to blur. It doesn't help that in order to become good at something you need to practise the methods of those who have gone before, until you don't just know them, you understand them.
That idea, that you need to understand what you are doing, is very important to me. In mathematics, when you know an equation, you can plug in the numbers and use it to solve a problem. When you understand how that equation was derived, get down to its roots, you can play with it, make changes, and solve a wider range of problems. The same is true of throwing a football, playing music, or designing a chair. Understanding what you are doing makes it possible to be both original and successful.
I've gotten a little off track with that last paragraph. Anyway, if you are still with me, I invite you to take a look back through some of my previous posts and see where you think I might land in those three classes. If you are also someone who likes to create things, take a look through your own work and see how you feel about that. And if you've read through all of this and you think that I'm way off base, I'm willing to admit you may be right.
Saturday, 1 June 2013

Saturday, 25 May 2013
Come Out to Wood '13
The Saskatchewan Woodworkers Guild's annual wood show is on now in the Galleria Building at Innovation Place. Get out and see it. Here are some teaser pics.


There's lots more where that came from. So come out and have a seat int the most comfortable rocking chair you'll ever sit in and if you are lucky Weldon Gray will be there to play you a tune on his hurdy gurdy.


There's lots more where that came from. So come out and have a seat int the most comfortable rocking chair you'll ever sit in and if you are lucky Weldon Gray will be there to play you a tune on his hurdy gurdy.
Saturday, 4 May 2013
Pen Molds, Version 2
Back before Christmas I turned a bunch of pens for gifts using Amazing Casting Resins. I made some molds to pour the pen blanks with the brass tubes already inside them, rather than drilling the blank and gluing the tubes in afterwards. While they did the trick, there were some problems that needed solving. Enter Version 2.

OK, so they aren't objects of beauty. What they are is leftover scraps of UHMW polyethylene that I scavenged from work. The polyethylene has two qualities that make it perfect for this application. One is that it machines easily (it can even be worked with a hand plane). The other, more important property is that the acrylic doesn't stick to it. I tried using ABS pipe but the acrylic bonded to that so hard it might as well have been one solid piece.

After screwing 2 pieces together I took them to the drill press and drilled a 5/8" hole a little deeper than the length of the brass tubes of the pen. Then I drilled a 1/4" hole in the bottom of the first hole that went almost through the block.
Next I took another piece of the UHMW over to the lathe and turned it down until it would just slide into the brass pen tube. I left a small step at the bottom so the brass tube wouldn't go all the way to the bottom and a small flange to keep the rod from going too far into the hole. The bottom of the rod was turned to 1/4" to fit snugly in the hole at the bottom of the mold.
Here are the brass tubes slid over the rods.

This picture sort of shows you how the rod fits in the mold.

The assembled mold , with the brass tube inside.
 And filled with resin.

About ten minutes later, give or take, depending on the room temperature, you can split the mold apart.

Sliding the blank off the pins may or may not be easy, depending on your timing. Most of the time though it's pretty easy. Once you do that you just need to square up the ends and the blanks are ready to turn.
The new pen molds are a big improvement over the old ones. The blank is a lot closer to round and there is less waste. It's easier to get the blank out of the mold as well, which was the main objective. There is still room for improvement, though. The pins, for instance, need some refinement. One day there will be a Version III (the roman numerals make it fancier).

OK, so they aren't objects of beauty. What they are is leftover scraps of UHMW polyethylene that I scavenged from work. The polyethylene has two qualities that make it perfect for this application. One is that it machines easily (it can even be worked with a hand plane). The other, more important property is that the acrylic doesn't stick to it. I tried using ABS pipe but the acrylic bonded to that so hard it might as well have been one solid piece.

After screwing 2 pieces together I took them to the drill press and drilled a 5/8" hole a little deeper than the length of the brass tubes of the pen. Then I drilled a 1/4" hole in the bottom of the first hole that went almost through the block.
Next I took another piece of the UHMW over to the lathe and turned it down until it would just slide into the brass pen tube. I left a small step at the bottom so the brass tube wouldn't go all the way to the bottom and a small flange to keep the rod from going too far into the hole. The bottom of the rod was turned to 1/4" to fit snugly in the hole at the bottom of the mold.
Here are the brass tubes slid over the rods.

This picture sort of shows you how the rod fits in the mold.

The assembled mold , with the brass tube inside.


About ten minutes later, give or take, depending on the room temperature, you can split the mold apart.

Sliding the blank off the pins may or may not be easy, depending on your timing. Most of the time though it's pretty easy. Once you do that you just need to square up the ends and the blanks are ready to turn.
The new pen molds are a big improvement over the old ones. The blank is a lot closer to round and there is less waste. It's easier to get the blank out of the mold as well, which was the main objective. There is still room for improvement, though. The pins, for instance, need some refinement. One day there will be a Version III (the roman numerals make it fancier).
Monday, 18 March 2013
Moments, Forgettable and Not
This past weekend I made my third annual trip to the Matisho Memorial Cancer Benefit at Waldheim, about 40 minutes north of Saskatoon. This great event brings together woodturners from across the province and beyond to raise money for cancer research. This year the event moved to a great new venue at Menno Industries. The larger venue allowed everyone to work in the same room without being crowded, neither of which were possible at the old venue. I was also able to back my truck right into the shop to unload my lathe and all the other (way too much) stuff I brought.
For this year's project I chose a piece of apple crotch from a tree that I cut down last summer. Because of the number of experienced turners that come out every year that are available for advice I like to do something a little above my level of experience. Although I've turned natural edged bowls before this piece of wood was a different shape than anything else I've done and that meant that I would be turning a lot more air than I was used to.

As you can see this piece of wood is a Y shape and making it round requires a lot of wood removal. I could have taken it to the bandsaw to round it off a little but the irregular surface meant that it would have been difficult to keep it parallel to the blade. I didn't want it to catch and break the blade, or worse, so I spent the morning rough turning the bottom of the bowl.

After lunch I changed the pace and turned a pen from a blank I had made the night before.

These were the first blanks to come out of the new molds I had made. I'll make a post about them another time.

After that I went back to work on the bowl. I turned it around so I could grab the tenon on the bottom with the chuck, and started to hollow the inside. I'm not going to bore you with any pictures of this part of the day because, frankly, I got carried away and forgot to take any. I do that a lot. Not really sure if this blog is better or worse for it.
By the way, I wasn't there by myself. There were about fifty of us there the first day, covering the complete spectrum of age and experience. I like to flatter myself by thinking I'm at about the middle of both.

By the way, the General lathes to the left were all supplied by our local Lee Valley. They even go so far as to make sure they don't schedule any tuning classes on the same weekend. I just thought such great support was worth a mention.
One of the cornerstones of the Matisho Memorial is education. The event grew from a class that was held at Larry's shop. Sharing knowledge and encouraging the next generation of turners is a big part of the weekend.

As the day wore down, some of the checks that my wood had started with turned into cracks. I decided to use some Amazing Casting Resin to fill them. Some handy duct tape on the inside of the bowl would keep it from running through.

I mixed in a little black dye and left it overnight.
The next morning I started off by making a few pen blanks with the amazing casting resin and my pen molds, and wound up giving a demonstration to a few curious onlookers. That's another good thing about this event, there's no pressure to get anything done. You can take a break whenever you want, wander around and see what others are doing, or just hang out and chat. A few people didn't do any turning at all but just decorated items they had already made.
 |
| This is clearly not my work. |
While my pen blanks set up I went back to work on my bowl. It had changed shape a bit overnight as the wood dried and the resin had not dried smooth so I needed to make it nice and round again. Of course the parts that needed the most work were out at the edge of the bowl where I was mostly turning air. A steady hand and a lot of caution were required. I also spun the bowl as fast as was reasonable so the tool was touching wood as often as possible.
The inside was about to the point where it was ready to sand so I switched to the outside. Again, caution was required as I worked my way from the bottom to the outside edge. It was almost lunch time and I was nearly there when I felt, as much as heard, the BANG!

There wasn't much else to do but take a deep breath and break for lunch. That or go off by myself and cry. There were too many kids around to swear. One thing I didn't do, though is toss the pieces in the trash. There was too much time invested in it. I have plans. It has simply changed from craft to art.
At lunch time we were joined by Larry Matisho's son with his wife and daughters. When I first joined the Guild about 10 years ago I took my first turning class from Larry. Although I had had a lathe for over 20 years at that point, I have to admit I had no idea how to use it. Larry gave me the basics to really use the tools to their full advantage.
After lunch I was going to turn some pens and I decided to offer a couple of the blanks I had made earlier to some of the kids that were turning pens. I wandered over to where they were working and that is how, by the luck of being in the right place at the right time, I got to give Larry's granddaughters their first lesson in turning. It was very special to be able to tell them that I had learned from their grandfather.

Thankyou, Robin and Emily, for a moment I won't soon forget.
Sunday, 3 March 2013
The Real Story of This Plane...

Is the blade.
A couple of years ago my Dad gave me a bag of wooden odds & ends that came from a friend of his. One of the pieces of wood in the bag was this one.
.jpg)
It felt heavy for its size and my first thought was "This would be great for making a small plane."
Further back in the mists of time my wife had come home from an auction with a box of turning tools. Among them was this skew chisel.

The blade was about an inch wide, just right for a plane this size. More importantly though it was tapered, just like some of the old plane irons used to be. In a wedged plane this would help to keep the blade from backing out in heavy use.
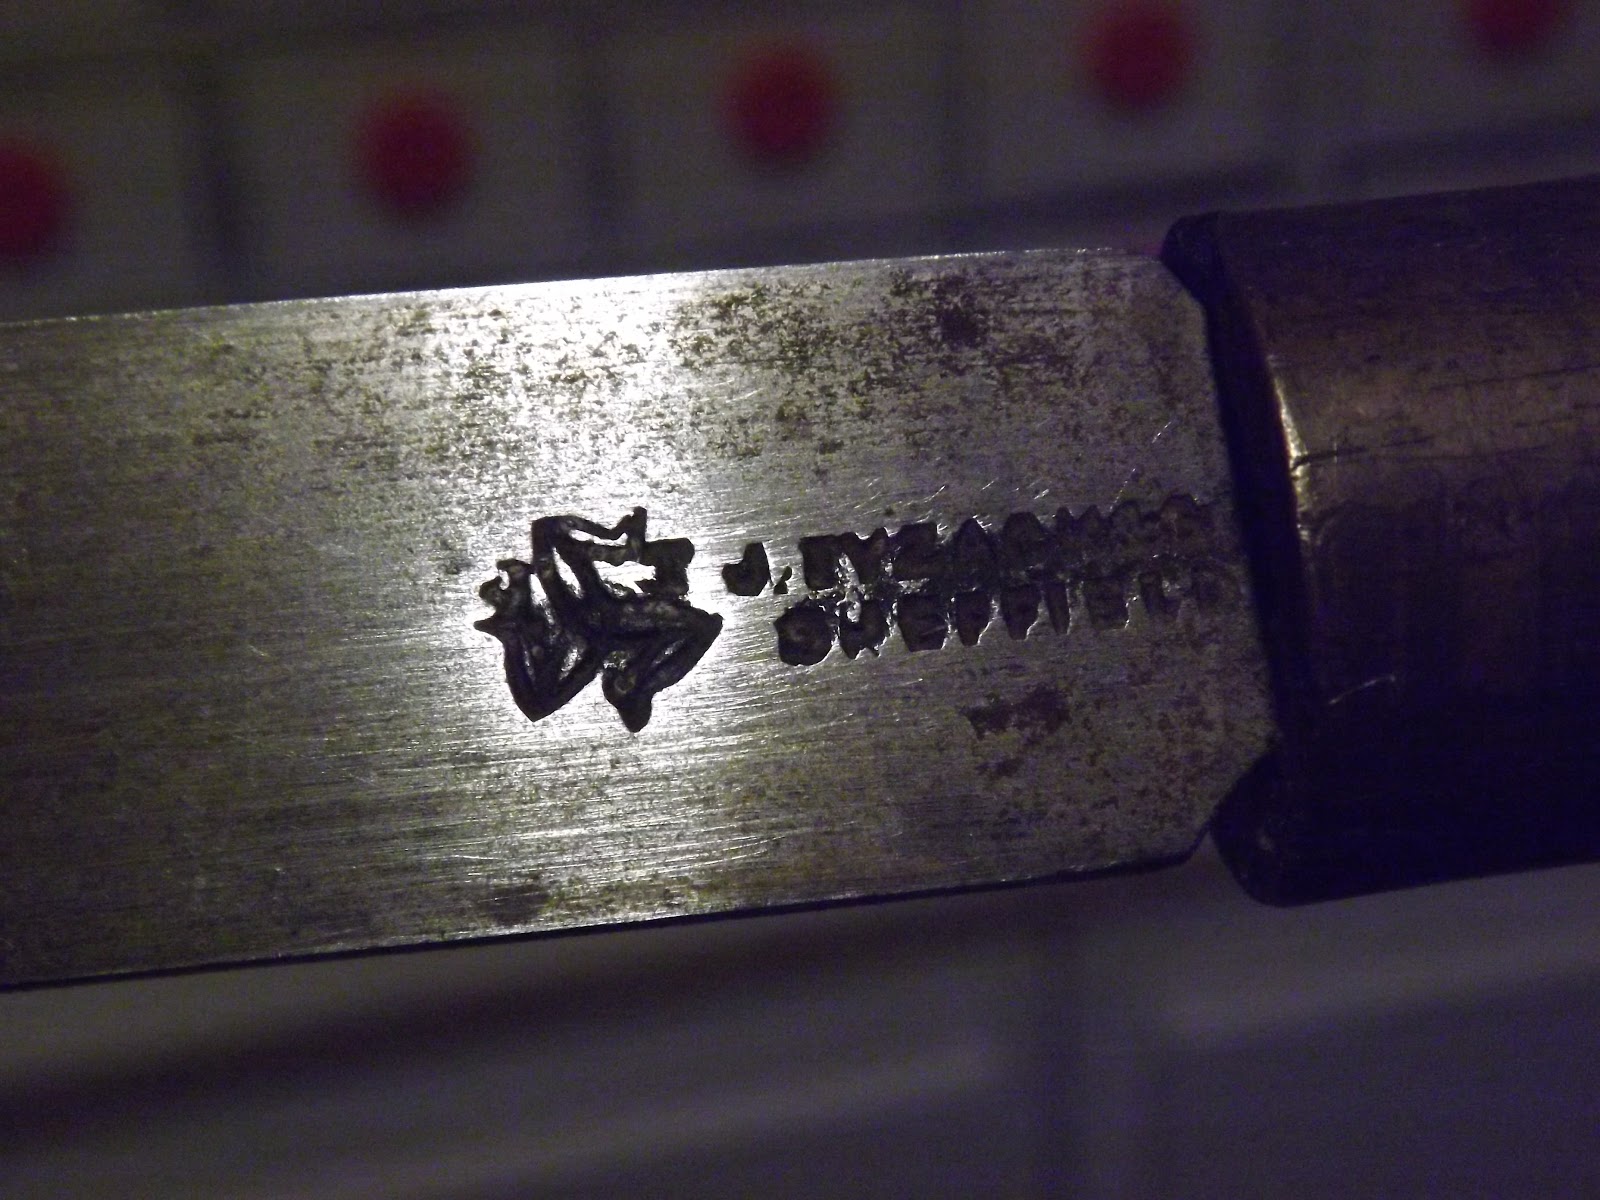
Another plus was that it appeared to have been made with the legendary Sheffield steel. I did a search on the maker, J. Tyzack & Son, and found the history of the company. You can read about it here. Unfortunately, the trademark was at the thicker end of the blade which meant that I could not use it on the plane blade.
I decided that I would take the time to cut the blade to the length I needed by hand. The reason was that I did not want to heat the blade up by grinding and ruin the temper of the steel. I went out and got some good hacksaw blades special for the purpose. I removed the blade from the handle, clamped it up, and set to work on the edge of the blade.
You have probably already guessed from the photo at the top of this post that that didn't go very well.
Ten minutes of vigorous sawing did little more than scratch the patina on this steel. I got out my multi-tool with the cut-off wheel and started to cut off the end of the blade. I worked slowly, pausing frequently, making sure that the steel never got too hot to touch. The fact that the temperature in my shop is usually below freezing at this time of year helped. It took me a couple of evenings work to get through the blade, and then a couple more to cut it from the main body.

When this photo was taken, that little bit of steel that was still holding was about the same thickness as the cardboard in a cereal box. Still, I could not bend it. This steel is hard.

During the times I was waiting for the blade to cool I would work away at the body of the plane.

After cutting the centre block apart on the band saw I used a float to do the initial leveling on the ramp. I find that by taking down the high spots this way it makes it easier to set the plane to finish it. this ramp was so small that even my block plane was too big to do the job. I wound up using a detail plane to flatten it.
Once the blade was cut to length I spent a week grinding the bevel, and another day flattening the back and giving it an edge. While that was going on I went back to that bag of odds & ends and came up with this piece for the wedge.

I don't know what it is, but it looks wild. It also has a very strong scent when it is worked. Someone told me it smelled like marijuana, but I wouldn't know anything about that. Anyway, I made the wedge and shaped the body and finally installed the blade.

Although the plane worked well there were a couple of problems. This is essentially a one-handed plane, and when I used it that way the top of the blade dug into the palm of my hand. Another problem was that it was tough to adjust the blade side to side without hitting the wedge.

I cut about 1/8" off the top end of the blade and dished the sides of the wedge and also shortened the wedge to match the blade.

Here are some shots of the completed plane.


This will be a great little plane. Smaller and lighter than a block plane, it will excel at chamfering and touch up work. One day I will get the trademark engraved on the blade as well. I think it is important to acknowledge where this steel came from, and to leave my own mark on this tool.
Wednesday, 30 January 2013
The Joy of Sharpening

I have a confession to make: I don't sharpen regularly. It's not like I don't know how...more like I just hate it.
I learned to sharpen out of curiosity, even though I was sure my chisels were good enough from the factory. Of course I was wrong. We spent all day at it in that first class, and I came away with one sharp plane blade and one sharp 1/2" chisel. At first I was seduced by the smooth back of the plane iron, the mirror finish of the micro-bevel, and the way my newly sharpened chisel sliced through the most difficult woods. I ran to Lee Valley and bought the tools to sharpen all my chisels and blades and set to work.
Oh, the drudgery! The mind-numbing, back-aching boredom! Backs refused to flatten, primary bevels would not be established, unless hours were sacrificed at the water stone alter. Even the blades that were advertised as 'just needing a quick honing' to be ready to use - those were the most frustrating! And that last bit took forever! That led to Kevin's Rule of Sharpening: When it looks like you are 95% done, you still have 95% of the work ahead of you.
It's not like I gave up on sharpening. If I got a new plane I would dutifully flatten the back of the blade and give it an edge...Once. But that was it. In some cases, like those chisels, the tools went literally years without another look. One by one my chisels fell victim to nicks and drops and neglect. My block plane was so dull you could almost see the radius of the edge with the naked eye.
Now, though, I have a project in mind where I will need that block plane. And I will need it to be sharp. With a deep sigh and a heavy heart I hauled out my stones and set out to re-do the primary bevel.
You know what? It wasn't that bad. In fact, compared to what I expected, it was downright pleasant. Fast, even. In what seemed like no time the primary bevel met the back. And the micro-bevel? Like, two minutes, including the time it took to change stones.
It went so well that I decided to give my chisels the same treatment. The same thing happened. Quick and easy, I had new fresh edges. Okay, the corners leave a little to be desired, but I had 4 chisels done in about 2 hours. The first time I did it they took about 2 hours each!
I guess all that hard work paid off in the end. Next time, I won't wait so long to touch up a blade. I still dread sharpening new blades but I will be much more likely to keep them tuned up. Hopefully, all my blades will see a lot more use.
Saturday, 19 January 2013
A Little Help, Please...
I'm having some trouble identifying this chunk of wood. It came to me in a bag of offcuts that I got from my dad that was part of a larger pile of offcuts that he got from a friend.

This is a closer look at the grain.

And the end grain.


This piece is 6.5" long by 2" wide by 1.3125" thick. and weighs 11 ounces. That works out to about 70 lbs per cubic foot. If you think you know what it is please leave a comment.
Subscribe to:
Posts (Atom)